1 Arrival in the Past: The Doomed Village
Upon arriving in Emberdale (Past), you will immediately notice the oppressive atmosphere. The sky is perpetually dark, choking on ash, and the volcano, Burnmount, rumbles in the distance. The villagers are in a panic, preparing for the "Guiding Light" ceremony which they believe will appease the angry mountain.
Your objective is to gather information about the ritual. Proceed to the large tent in the center of the village square. Here you will meet Palmela, the renowned fortune teller. She predicts a "Black Flame" will consume everything if the ceremony proceeds.
After speaking with her, head to the large estate on the hill (The Mayor's House). Go upstairs and speak to the Mayor to try and convince him to stop the festival. He will refuse, citing tradition.
📜 Lore Note: The Guiding Light
The villagers throw "Kindling Water" into the volcano to calm it. However, Palmela senses that in this specific timeline, the volcano is not angry—it is being agitated by a monster living inside the magma. Throwing water on it will only make it worse.
— Strategic Decision Point —
🛡️ Buy Iron Shield
Cost: 650GThe shop sells the Iron Shield. It provides +4 Defense and minor fire resistance. This creates a "tank" character (Kiefer) who can absorb physical hits from the upcoming boss.
🌿 Hoard Herbs
Cost: 8G / unitFill every inventory slot with Medicinal Herbs (6-8 per person). The Glowering Inferno boss fight is an endurance test, and running out of MP for healing is the #1 cause of death.
2 Ascending the Burnmount
Once night falls (after resting at the Inn), head to the village square. A cutscene will play where the ceremonial fire turns black. Palmela's prophecy has come true. She will ask you to escort her into the volcano to stop the disaster. She gives you the Kindling Water and unlocks the gate to the mountain.
Dungeon Navigation Guide
- Level 1 Follow the linear path. Avoid the green bubbling pools if possible, though damage is minimal.
- Level 2 (Fork) You will encounter a split path. Take the Right Path. The left path leads to a dead end with a Mimic (high danger) and a medicinal herb. The Right path leads deeper.
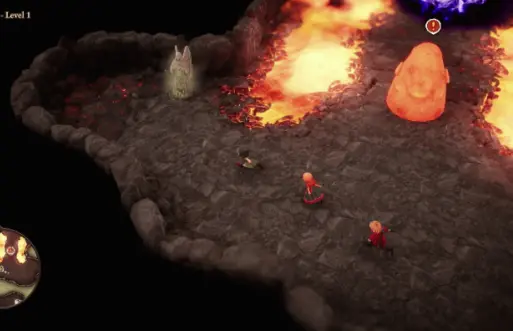
- Lower Depths This area has extensive lava floors. Do not heal every step. Let your HP drop to about 50-60% before using a mass heal. Just before the final door, you will see a Healing Jar (a glowing pot). Interact with it to fully restore your Party's HP and MP.
🔥 Lava Mechanics
Stepping on lava deals 1 HP damage per tile. It cannot kill you (stops at 1 HP), but it makes you vulnerable to surprise attacks.
👾 Enemy Priority
Beware of the Magma Staff. They cast 'Sizz' (Fire AOE). Kill them first. Chimaeras can breathe fire, so focus fire on them second.
3 Boss: The Glowering Inferno
At the heart of the volcano, you find the entity causing the eruption. This is the first boss in the game that requires strict turn management.
Turn-by-Turn Strategy
- The Opening: Buff Kiefer with 'Focus Strength' (if learned) or just attack. Maribel should cast 'Sap' immediately to lower the boss's defense. The Hero should attack or heal if the boss opens with Fire Breath.
- The Warning Sign: Pay close attention to the text log. If you see the message "The Inferno is glowering ominously!" (or similar variant implying a charge up), stop everything.
- The Defense Turn: On the turn immediately following the warning, ALL characters must select Defend. The boss will unleash a devastating AOE attack that can wipe the party if you are unshielded. Defending reduces this damage to manageable levels (single digits).
- The Counter-Attack: Immediately after the big attack, the boss usually takes a "rest" turn or does a weak physical attack. This is your window to Heal (Maribel) and Attack (Kiefer/Hero).
4 Return to the Present
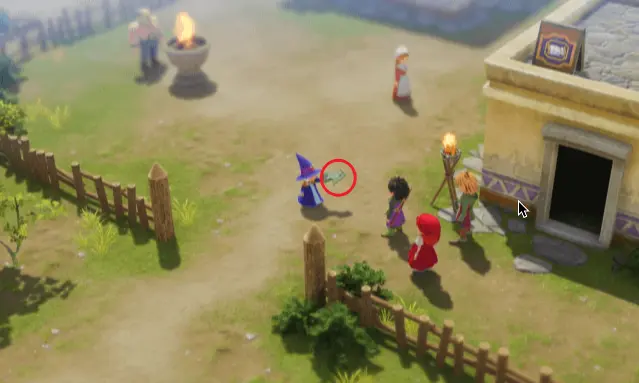
After defeating the Glowering Inferno, the volcano calms down. Palmela thanks you and gives you the Green Fragment (Past) as a reward. The village is saved.
Use the portal to return to the Shrine of Mysteries. You will notice the Red Pillar is now glowing. Step into the teleporter to return to Estard Island.
Open your world map. A new island has emerged to the northeast of Estard. Board the ship and sail to the Present Day Emberdale.
Exploring the Restored Village
The gloom is gone, and Emberdale is now a famous hot spring resort. There are two critical items to collect here before moving to the next island.
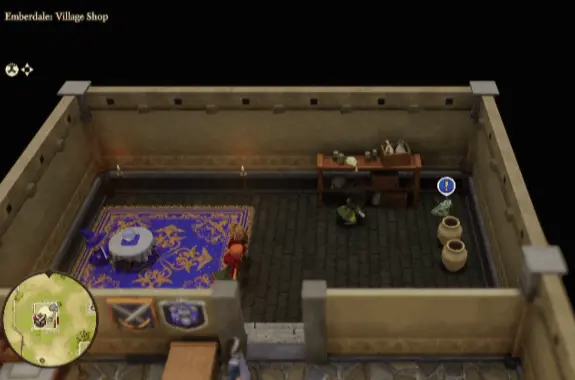
- 1. The Equipment Shop: Locate the equipment shop (the building opposite where Palmela's house used to be). Search inside to find the Red Fragment.
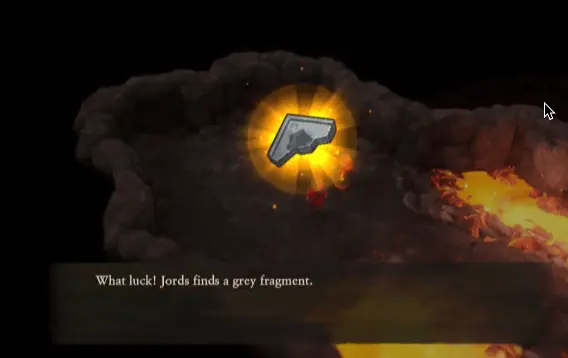
- 2. Return to Burnmont: The volcano is now a tourist attraction. Hike up the mountain and descend to Underground Level 1. In the area where the lava flow used to block your path, you will now find solid ground. Look for a Grey (?) Fragment lying on the floor.