The Bloodmoon Route I Use to Unlock All 12 Characters
I chain the 15-minute unlocks, stack the Sargon and boss objectives, then finish Jaman Jato, Baal’Thamut, and Megalo Sargon without wasting full runs.
Updated:

Quick Answer
If I am starting Legacy of the Bloodmoon from scratch, I open Malice Bloodmoon’s coffin first, then follow the dependency chain instead of trying to clear Red Moon Manor in one oversized run.
My route is:
Malice coffin
→ Malice for 15 minutes + Cardinal Rain
→ Calogero for 15 minutes + Bloodlust
→ Ashtart for 15 minutes + Dust to Dust
→ Sargon + Descent Into Misery Level 9
→ Nameless Fool + 7 deaths
→ Congregation + Velvet Dodecahedron + In’Kujata setup
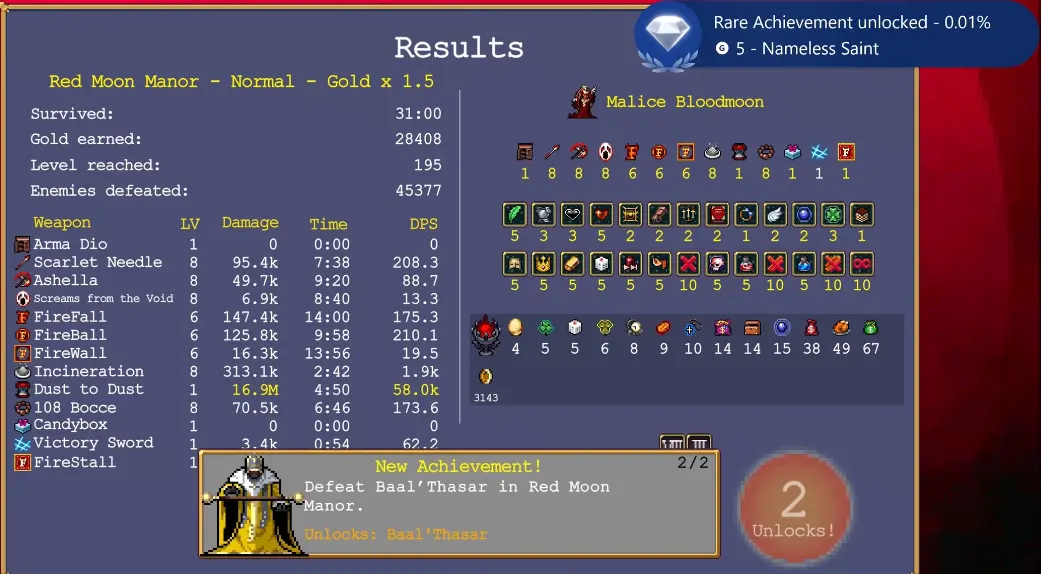
→ defeat Ashtart, Sargon, Congregation, and Baal’Thasar in one run
→ use Baal’Thasar for Jaman Jato farming + Damnation
→ finish with Sargon + Velvet Dodecahedron + FireStall
For the early 15-minute unlocks, I leave once the required unlocks have registered. I save long Manor runs for objectives that actually need to stay together.
The biggest time sink in Bloodmoon was not the enemies.
It was treating every unlock as its own run.
There are 12 new characters, but a large part of the roster is built as a dependency chain: one character unlocks a starting weapon, that weapon opens an evolution, and the evolution gives me the next character.
Later, the structure branches into special conditions such as 7 deaths, 6,000 Jaman Jato kills, a four-boss run, Velvet Dodecahedron requirements, and two late transformations.
Once I started planning around those dependencies, I stopped wasting full 30-minute stages on objectives that were already finished.
I Open Malice’s Coffin First
The first gate is straightforward: Malice Bloodmoon is inside the coffin in Red Moon Manor.
I enter with a character I already trust. At this stage, damage only matters enough to reach the coffin safely; I am not trying to create a perfect late-run build.

Once the coffin opens, I leave unless I already have another nearby objective that makes the extra time worthwhile.
If reaching the coffin is the problem, I use the Red Moon Manor route rather than turning this page into a second map walkthrough.
Malice Gives Me Two Progression Checks in One Run
Malice needs to survive 15 minutes to unlock Scarlet Needle globally.
While that timer is running, I prepare Scarlet Needle’s evolution with Pummarola.
I finish the weapon, finish Pummarola, then use an evolution chest for Cardinal Rain.

Cardinal Rain unlocks Calogero Bloodmoon.
That gives me two useful results from one run:
- 15 minutes with Malice → Scarlet Needle;
- Scarlet Needle → Cardinal Rain → Calogero.
Once both notifications have registered, I am done here.
Hurry Mode can reduce the real-world wait if I want it, but the unlock itself does not depend on Hurry.
Calogero Leads Straight Into Ashtart
Calogero follows the same general logic, but I keep the weapon pool even tighter.
His starting weapon is Ashella.
To evolve it, I need Duplicator, whose maximum is only Level 2. Once Ashella is finished and Duplicator is maxed, the next valid evolution chest gives me Bloodlust.
Bloodlust unlocks Ashtart.
I still remain until the 15-minute checkpoint because Calogero’s survival requirement adds Ashella to the broader weapon pool.
That means this run has one clean finish condition:
Bloodlust obtained + 15 minutes survived.
Anything after that is optional.
Ashtart Opens Sargon
Ashtart’s branch uses Incineration.
The required passive is Candelabrador. Once the weapon and passive are ready, the evolution chest produces Dust to Dust.
That unlocks Sargon.
I also keep Ashtart alive until 15 minutes so Incineration becomes available outside her starting loadout.
At that point the first major dependency line is complete:
Malice → Calogero → Ashtart → Sargon.
The exact passive maximums and evolution checks belong in the Bloodmoon weapon evolutions guide. For progression, the important part is knowing that each successful evolution opens the next character.
Sargon Is Where the Route Starts Branching
Sargon changes the rhythm of the DLC because one run can prepare several later objectives.
The first target is Descent Into Misery.
I need it at Level 9 to unlock Nameless Fool.

While I am already playing Sargon, I also start opening his fire branch:
- FireFall;
- FireBall;
- FireWall.
Those eventually combine into FireStall.
I do not need to force every fire step in the exact same Sargon run if RNG is bad. What matters is that I avoid filling the weapon pool with branches that make the required pieces harder to finish.
Banish and Seal are especially useful here.
Once Descent Into Misery reaches Level 9, Nameless Fool is unlocked and the route changes again.
Seven Deaths With Nameless Fool Are a Counter, Not Seven Long Runs
Congregation requires me to die a total of 7 times with Nameless Fool.
The useful part is that revivals count.
So I treat this as a death counter rather than seven separate stage attempts.
Awake helps because the extra revivals let me register multiple deaths without restarting immediately. If I already have access to dangerous cursed items, Mad Groove can pull them toward me after the useful part of the run is finished.
The process is simple:
- get through any survival requirement I still care about;
- start taking deliberate deaths;
- revive when possible;
- keep counting until the Congregation unlock appears.
Once the game confirms Congregation, I stop.
The target is 7 deaths, not seven completed runs.
Congregation Opens Velvet and the Late-Game Setup
After Congregation, the route is no longer a straight ladder.
Two pieces matter before the final cleanup:
- Velvet Dodecahedron;
- In’Kujata.
For Velvet, I advance Congregation’s weapon branch through Screams from the Void and its evolution.
The important distinction is that unlocking Velvet does not automatically mean I am holding it in the current run. Later character requirements explicitly care about holding Velvet, so I still need to obtain the passive when I build for those transformations.
For In’Kujata, the statue can be broken with either:
- 108 Bocce;
- 108 Responsive Prayers.
If I already have a valid statue-breaking setup, I combine that objective with the same general cleanup phase instead of opening a separate run purely for the statue.
The exact statue position belongs to the Red Moon Manor guide.
My progression checkpoint here is:
Velvet unlocked + In’Kujata available = the late boss branch is ready.
Nameless Saint Is the Run I Actually Commit to Finishing
Most early Bloodmoon runs can end as soon as their requirement is satisfied.
Nameless Saint is different.
I must defeat:
- Ashtart;
- Sargon;
- Congregation;
- Baal’Thasar;
in a single run.
That condition is what makes this a proper Manor commitment.
I use a character and build I already trust instead of forcing one of the newest unlock characters into the route simply because it is new. At this point, reliable damage and movement are more valuable than squeezing another unrelated experiment into the loadout.
The individual boss triggers, maze route, teleporter, and attack patterns stay in the Red Moon Manor Owner.
For this page, only the completion state matters.

This is one of the few places where splitting the bosses into separate cleanup runs is actively worse.
The Saint condition needs all four together.
I Use Baal’Thasar for Three Late Objectives at Once
After Baal’Thasar becomes playable, I use him while several remaining requirements overlap.
The three I care about are:
- survive 15 minutes with Baal’Thasar to unlock Blacken Firmament;
- defeat 6,000 Jaman Jatos to unlock Jaman Jato;
- hold Velvet Dodecahedron and obtain Damnation to unlock Baal’Thamut.
Those goals fit into one long cleanup run far better than three isolated runs.
I head toward the Jaman farming area, let the kill count build, and work on Baal’Thasar’s weapon setup at the same time.
Blacken Firmament evolves with Torrona’s Box into Damnation.
The image is useful here because it proves the weapon state, not the character model.
Once Damnation appears while Velvet is held, the Baal’Thamut condition is satisfied.
At the same time, I stay in the Jaman farming area until the game confirms the 6,000 Jaman Jato requirement.
I do not infer that number from total kills.
A run can end with a huge overall enemy count and still leave me unsure how many of those enemies were actually Jaman Jatos.
The unlock notification is the checkpoint that matters.
FireStall Is the Last Piece I Need for Megalo Sargon
The final Bloodmoon character cleanup brings me back to Sargon.
The requirement needs:
- Sargon;
- Velvet Dodecahedron held;
- FireStall obtained.
FireStall comes from combining Sargon’s fire weapon chain.

This is why I start opening the fire branch during the earlier Sargon phase.
By the time I return for the final transformation, the run should be a targeted setup rather than another discovery session.
I select Sargon, obtain Velvet, assemble the required fire weapons, and wait for FireStall.
Once the Megalo Sargon unlock registers, the 12-character Bloodmoon roster is complete.
My Bloodmoon Stop Conditions
The fastest part of this route is knowing when a run has stopped being useful.
These are the checkpoints I use:
- Malice coffin: leave once Malice registers.
- Malice: Cardinal Rain + 15-minute survival.
- Calogero: Bloodlust + 15-minute survival.
- Ashtart: Dust to Dust + 15-minute survival.
- Sargon: finish the Level 9 Descent Into Misery requirement and whatever fire progression I can reasonably fit.
- Nameless Fool: continue until all 7 deaths register.
- In’Kujata: stop once the statue objective confirms.
- Nameless Saint: stay because all four bosses must die in one run.
- Baal’Thasar: combine the 15-minute survival, Jaman farming, and Damnation setup when possible.
- Jaman Jato: keep farming until the 6,000-kill unlock itself appears.
- Megalo Sargon: once Velvet + FireStall satisfies the condition, the character chain is finished.
That is the part of Bloodmoon progression I find most useful to remember.
A 15-minute requirement deserves a 15-minute run.
A four-boss requirement deserves a full boss route.
A 6,000-enemy requirement deserves enough time for the actual counter to finish.
The run should last as long as the condition requires—not automatically until the stage timer says it is over.