R.E.P.O. Map Guide
Featured
How Do You Survive Sunstone Valley Resort in R.E.P.O.?
Find Sunstone Valley Resort, navigate its mining rooms, avoid collapsing floors and mine carts, move heavy valuables, and escape with your loot.
Read Guide →Game Guide Hub
Start a run in R.E.P.O. v0.5.0, reach extraction, explore the new Sunstone content, handle Mega Modules, and learn when the new equipment is worth buying.
Recommended Order
Use these guides to find the right R.E.P.O. walkthrough, solution or next step.
Map Guide
Find Sunstone Valley Resort, navigate its mining rooms, avoid collapsing floors and mine carts, move heavy valuables, and escape with your loot.
Monster Guide
Avoid Pony's tongue grabs, ceiling attacks, and kicks in R.E.P.O. Learn how to fight it, recover lost weapons, and survive dangerous encounters.
Extraction Guide
Stack valuables to reach the yellow extraction beams, trigger Moon Judging, earn pumpkin rewards, and avoid losing loot to unstable towers.
Shop Guide
Get Shopkeeper discounts in R.E.P.O. by offering items, learn the three-attempt limit, and avoid losing expensive equipment to failed gambles.
Guide Cluster
Find Sunstone Valley Resort, navigate its mining rooms, avoid collapsing floors and mine carts, move heavy valuables, and escape with your loot.
Read Guide →Avoid Pony's tongue grabs, ceiling attacks, and kicks in R.E.P.O. Learn how to fight it, recover lost weapons, and survive dangerous encounters.
Read Guide →Stack valuables to reach the yellow extraction beams, trigger Moon Judging, earn pumpkin rewards, and avoid losing loot to unstable towers.
Read Guide →Get Shopkeeper discounts in R.E.P.O. by offering items, learn the three-attempt limit, and avoid losing expensive equipment to failed gambles.
Read Guide →Start or continue a run in R.E.P.O. v0.5.0, find the extraction point, and collect enough valuables to meet the displayed quota before returning to the truck. Sunstone Valley Resort enters the normal level rotation, so you can encounter the new content without completing a separate mission.
The Sunstone Update changes more than the level you explore. An ordinary extraction can now offer a stacking bonus, familiar maps contain new hazardous rooms, and the shop has another way to save money—or lose an item you were planning to buy.
Some additions are easy to miss. The yellow beam over extraction looks like a restriction, the new Human Gun does not always fire when its trigger is pulled, and a large room that appears safe can suddenly become dangerous when a scanning machine turns toward you.
Getting through the next level still depends on the same basic job: recover enough valuables, preserve their value, survive the trip back, and spend your earnings on something that improves the following run. The new mechanics create opportunities, but they can also consume time or equipment that your team needs to finish that job.
A R.E.P.O. run moves through a repeating cycle of exploration, extraction, and shopping. The Sunstone Update does not replace that progression with a separate campaign.
Start by locating the extraction point before moving expensive objects too far from where you found them. The shortest route back is not always suitable for the item you are carrying, particularly when it is large, fragile, or difficult to control.
Once you know the return route, use this sequence:
Your carried earnings matter only if the run continues successfully. Losing a player or damaging an expensive object to collect one more unnecessary valuable can undo the benefit of an otherwise successful extraction.
Health and practical upgrades are usually more useful than spending everything on an expensive weapon that leaves the team without recovery options.
The correct purchase depends on the previous level. A team that repeatedly struggles to move heavy valuables has a different problem from a team losing players to enemies.
A sensible early shopping decision is to check whether everyone has enough survivability for the next round, then choose between transport improvements and defensive equipment. Strength can make heavy objects easier to handle, while movement upgrades become more useful when awkward routes and vertical spaces are slowing the team down.
Do not treat one player’s preferred shopping order as a fixed requirement. Prices and available items can change between visits, and a purchase that is useful for one team may be less important for another.
Sunstone Valley Resort enters the normal level rotation in v0.5.0. You can encounter it early in a run without reaching Level 10 or completing a separate mission, but it is not guaranteed to appear first.
When the resort loads, locate extraction before moving large valuables through the mining rooms. The new environment includes breakable flooring, mine carts, and crystal-related movement effects. Follow the Sunstone Valley Resort guide to plan a safe return route and handle its transport hazards.
Pony can move overhead and interrupt a valuable haul by grabbing or throwing players. Put down anything difficult to carry, make room to retreat, and check its position before trying to recover your loot.
You can fight Pony, but killing it is not required for an ordinary extraction. For its attack patterns, melee combat, and weapon-loss risks, follow How to Beat Pony.
The update also expands four existing levels with 18 additional rooms:
That means returning to a familiar map does not guarantee a familiar room layout. Some additions are large, unusual spaces with environmental hazards that require more attention than ordinary corridors.
A new room can contain a valuable worth collecting, but the hazard controlling the room may be more important than the item itself. Identify the moving or scanning machinery before pushing the C.A.R.T. into the middle of an unfamiliar area.
One of the new large rooms contains a statue-like security machine that turns to observe different parts of the area.
The room is dangerous because players can be caught and thrown when the machine detects them. An encounter near a hole ended with a player being thrown into the opening and dying.
A safer crossing starts by watching the machine’s scanning direction. The green-lit area indicates where it is looking, so wait for an opening outside that area before moving toward the next piece of cover.
The statue’s position matters more than trying to force a straight route through the room. Players who moved into its watched area had trouble crossing, while repositioning away from its attention allowed another attempt.
A player also investigated whether a control in the middle could deactivate the machine, but that interaction did not establish a dependable way to shut it off. Do not assume a central object will permanently disable the hazard.
Check the route on foot first.
A cart full of valuables can become an obstacle when the machine changes direction or an enemy enters the room. The added weight and width make a quick retreat more difficult.
For a valuable already within reach of the entrance, carrying it back without crossing the most dangerous part of the room may be enough. For objects farther inside, identify a safe approach and return route before committing the cart.
The same principle applies to other unfamiliar large rooms: inspect the hazard, identify whether it can interrupt movement, and decide whether the remaining valuables justify entering it.
Three shop items were added in the Sunstone Update:
Human Gun, Human Adventure Cable, and Recharge Orb.
They serve different purposes. The Human Gun provides a revolver with unusual firing behavior, the Adventure Cable helps interact with and move targets, and the Recharge Orb restores charge to nearby rechargeable equipment.
Buying one simply because it is new can leave the team short of health, strength, or other equipment needed for the next level.
The Human Gun is a revolver with a physical rotating cylinder.
Its unusual handling means pulling the trigger does not always result in a shot. The cylinder’s position matters, and attempting to fire while it is spinning can result in no discharge.
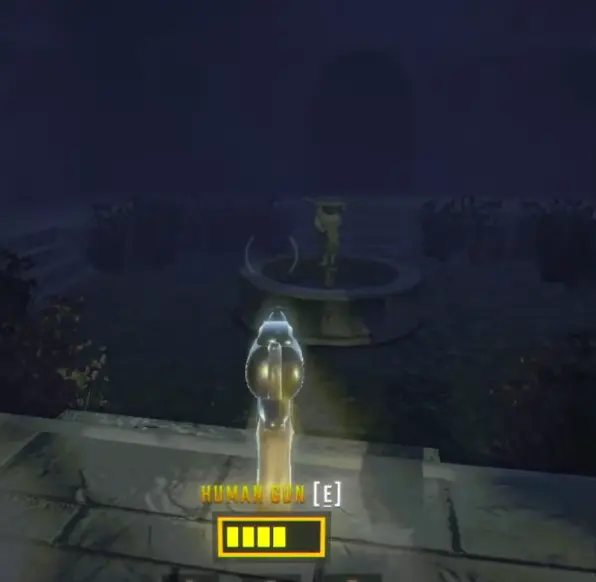
During one encounter, players repeatedly tried to operate the revolver before getting it to fire. The cylinder was moved through physical handling, and firing while it was still spinning caused additional confusion.
When using the Human Gun:
The Human Gun was discussed at prices around $27,000–$30,000 in different shopping encounters. Those amounts are examples from individual shops rather than guaranteed prices.
It is a significant purchase when the team still needs basic survival equipment. A gun that consumes most of your available money may leave little room for health or other necessities.
The Human Adventure Cable works like a tethering or whipping tool. It can catch targets and move them through physical interaction.
Players used it to grab enemies and swing them around, although controlling the result was not always straightforward. The target may move differently from what you intended, especially during a chaotic fight.
The cable is most useful when you have space to control the target after connecting. A crowded room or a narrow passage can make the interaction harder to manage.
It also uses charge. During one session, players noticed the charge changing when the cable was extended, although the exact consumption behavior was not fully established.
Check the remaining charge before relying on the tool during another encounter. Treat it as a control option rather than an unlimited method of disabling enemies.
When shopping on a limited budget, a cable is easier to justify when your team already has enough basic health and a plan for dealing with enemies.
The Recharge Orb restores charge to rechargeable equipment within its area of effect.
It can affect multiple items, but its charging capacity is limited. Charging more than one depleted item means sharing the available recharge rather than assuming each item receives an unlimited refill.
Players discussed the example of two fully depleted items receiving a partial recharge each instead of both returning to full charge.
That makes the Orb particularly useful when several members of the team are carrying equipment that depends on stored charge.
Bring the items you want to recharge within its effective area and check their charge indicators afterward. A tool with limited remaining charge should be restored before the next difficult encounter, not after it has already become unusable.
The Orb is a less compelling purchase when nobody on the team is carrying equipment that needs charging. Spending money on additional charge has little benefit without a practical item to use it.
The yellow beams above extraction mark the optional Moon Judging challenge. You can complete a normal extraction without reaching them.
Once you have enough valuables to meet your quota, decide whether you have suitable objects and time to attempt the extra reward. For the tower arrangement, judgement messages, and pumpkin rewards, follow How to Please the Moon.
A hidden interaction involving a large tree and a cube uses matching faces as part of its puzzle.
The important detail is that the cube’s orientation matters. Turning the object without checking which face is being presented can leave it misaligned with the intended position.
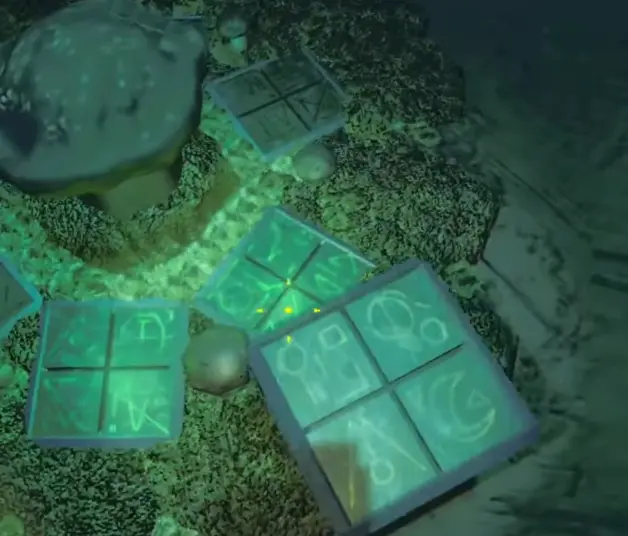
When handling this interaction:
A successful interaction caused an unusual object to become active. It was heavy, difficult to handle, and capable of electrical effects near other objects or enemies.
The value of the resulting object can make the interaction tempting, but moving it is not automatically safe. In one encounter, the object became difficult to transport and was eventually broken during the surrounding chaos.
If you reach the tree without a suitable cube, you cannot complete the matching interaction yet. Examine the symbols before moving anything into position, and do not assume the six positions require six separate cubes. The important step is presenting the matching faces without damaging the object.
In v0.5.0, holding a shop item toward the Shopkeeper can trigger a discount gamble. The result may lower the purchase price or destroy the offered item.
Check whether your team can afford to lose the item before handing it over. The Shopkeeper discount instructions cover the interaction, attempt limit, repeated discounts, and failed purchases.
The shop map now includes a shopping list showing items currently placed at the extraction point.
Open the map while shopping and inspect the list before completing purchases. This is useful when teammates are carrying different equipment or somebody has moved an item without the rest of the group noticing.
During one shopping visit, the group noticed a Valuable Tracker appearing on the shopping list when they had not intended to include it. Checking the items before checkout helped them identify the unwanted purchase.
The list is particularly helpful in a full cooperative lobby. It gives the team another opportunity to confirm what is being purchased without relying entirely on verbal coordination.
Some v0.5.0 changes affect ordinary play even when you are not exploring the new map.
Gamepad support is now available, while grabbing and melee handling have separate adjustable Grab Lead settings. These settings control how held objects and melee swings move ahead of your aim.
When an object or weapon feels difficult to control after updating, check the Grab Lead settings before assuming the item’s behavior is permanently changed. The update also reworked Tumble Climb for climbing and swinging.
The expression wheel now provides previews and supports both mouse and gamepad input. The update also introduced 21 additional interface languages and 10 cosmetics, with a mirror next to the shop’s Cosmetic Machine.
After changing the controls, try handling a low-value object before carrying fragile valuables through another level. A small adjustment to Grab Lead can feel very different when lifting, turning, or swinging an object under pressure.
The next useful decision depends on what actually interrupted your progress.
A team that failed to reach extraction because an expensive object could not pass through the route should solve the transport problem before searching for more loot. A team struggling with a new large room should recognize the hazard before bringing valuables into it again.
For combat losses, decide whether additional health, a dependable weapon, or better positioning would have prevented the failure. Spending everything on one unfamiliar new tool is rarely helpful when the rest of the team has no way to recover from another dangerous encounter.
A successful run can also create new opportunities. Once you have enough valuables for extraction, you may have time to attempt the Moon bonus. Once you reach the shop, you may be able to reduce a purchase price. Both are optional risks that should come after the requirements for continuing the run are secure.
Keep your next goal specific: finish the extraction, protect the equipment you need, and avoid repeating the mistake that ended the previous attempt. The Sunstone Update offers more ways to earn money and interact with the environment, but completing another level is still the result that matters most.