Backrooms Lost Runners Puzzle Solutions
A practical Backrooms Lost Runners puzzle solutions guide for players blocked by door messages, backup power, M.E.G. switches, pressure panels, valves, unstable zones, password clues, keycard gates, blood trails, generator fuel, elevator activation, and second-section valve objectives.
Updated:
Quick Answer
Use this page as a puzzle blocker diagnosis guide. Match the door text, visible clue, or route symptom to the table below, then jump to the fix or the detailed Level 0 / Level 1 guide.
Blocked Door Diagnosis
Start here. The fastest way to solve a Backrooms Lost Runners puzzle is to identify what kind of blocker you are facing.
| What you see | What it usually means | Fast fix | Detailed guide |
|---|---|---|---|
| A door does nothing near the start | Backup power or first route state is missing | Restore backup power, then recheck the route | Level 0 Walkthrough |
| M.E.G. door will not open | The door needs a nearby switch trigger | Find the switch box, interact, then return to the door | Level 0 Walkthrough |
| Bridge route is unstable | Power state has not fully updated | Use the early power route before crossing | Level 0 Walkthrough |
| Door mentions first / second compartment pressure | Pressure system chain is incomplete | Use the pressure panel, pipe route, red valve, then the second pressure branch | Level 0 Walkthrough |
| Password display shows partial numbers | You have only part of the code | Search the nearby rooms, swarm-sound branch, and unstable zone | Level 0 Walkthrough |
| Find the Numbers prompt appears | More password clues are still missing | Do not guess; keep searching clue branches | Level 0 Walkthrough |
| Unstable Zone sign appears | The route may hide a clue or update inside | Bring almond water, enter quickly, leave after the clue | Level 0 Walkthrough |
| Key card required | You need the M.E.G. Access Card | Follow the blood trail route and recover the card near the dead body | Level 1 Guide |
| Blood trail seems to disappear | The route may continue through a small hole or drop | Return to the last blood mark and check the floor near the final marks | Level 1 Guide |
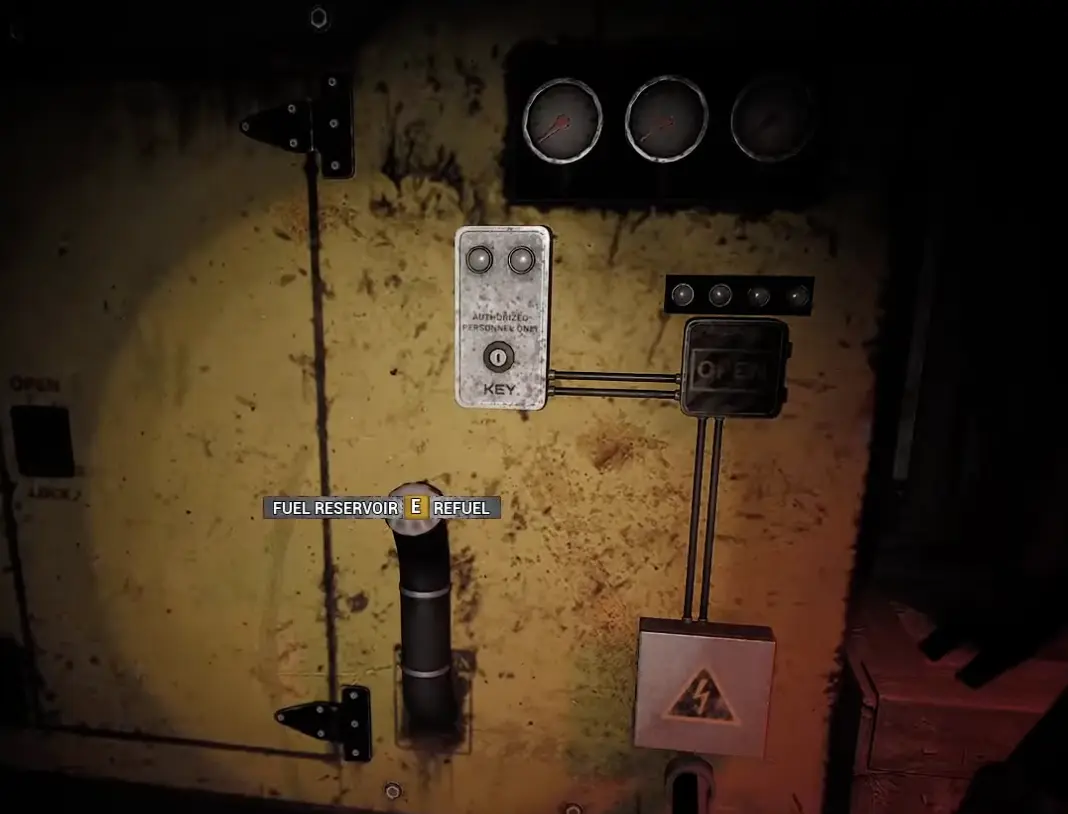
| Fuel reservoir appears | You are in a fuel → key → button route chain | Refuel, complete the key state, then use the button / control | Level 1 Guide |
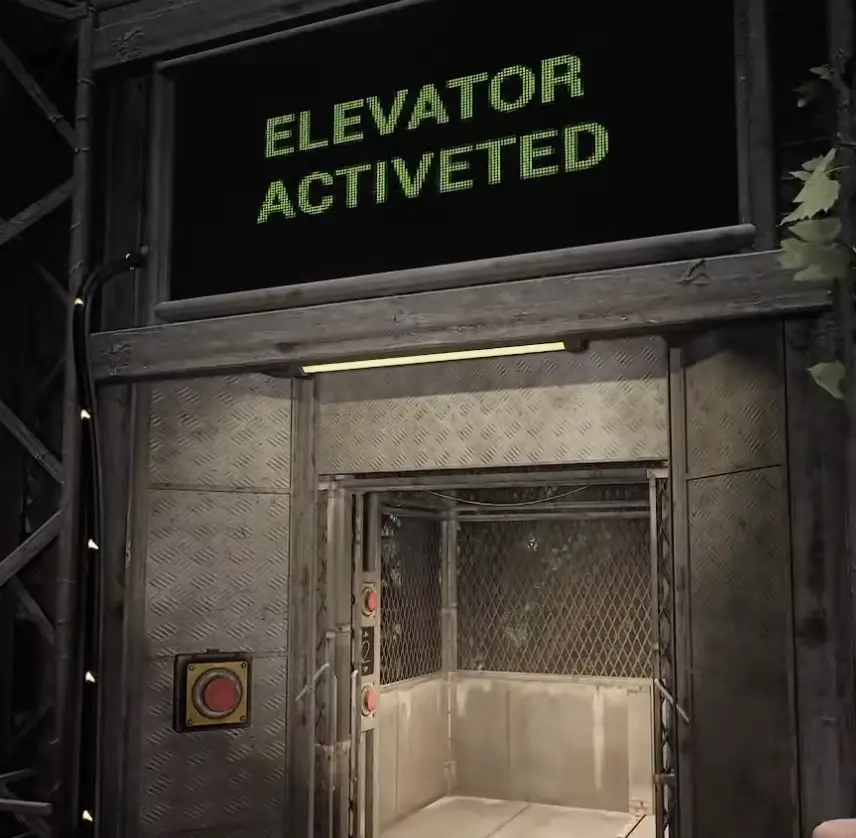
| Elevator will not activate | The elevator route state is not complete | Survive the activation sequence and wait for Elevator Activated | Level 1 Guide |
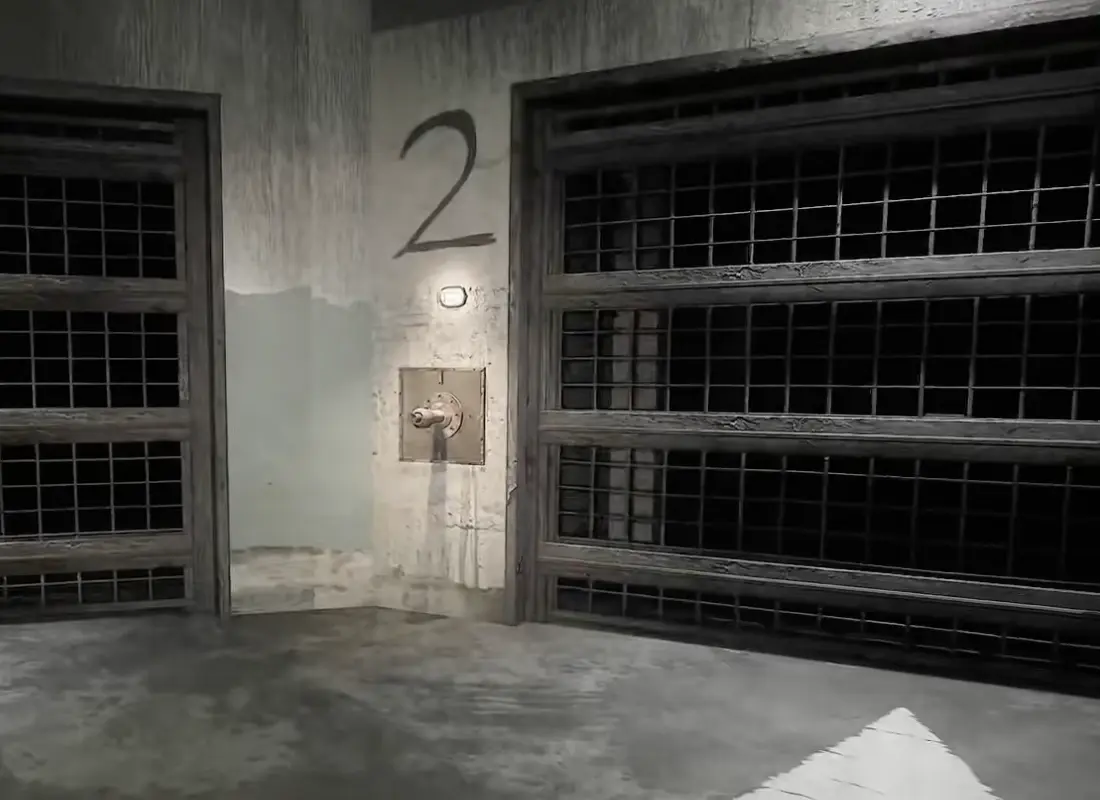
| Need valve appears after elevator | The second section has started a new system check | Search the second section for the valve objective | Level 1 Guide |
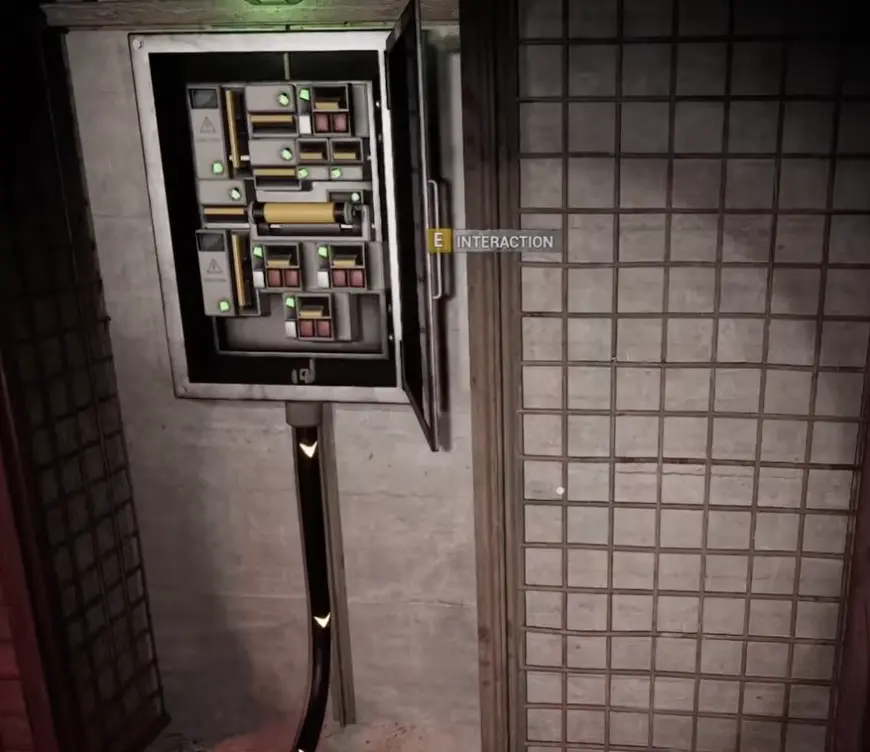
Backup Power and First Puzzle
Use this section if you are blocked near the start and the route does not seem to update.
The first puzzle teaches the main rule of Backrooms Lost Runners: a door often opens only after the correct route state changes. If a door still does nothing, go back to the power / switch route instead of repeatedly clicking the door.
| Symptom | Fix |
|---|---|
| Door does nothing after the opening objective | Restore backup power first |
| Switch used but no route opens | Recheck the newly powered path, not just the same door |
| You are looping in the start area | Return to the wire / switch route and follow the updated path |
| You want the full route | Use the Level 0 Walkthrough |
M.E.G. Door Trigger
Use this section if a M.E.G. door blocks you early.
This blocker is a switch problem, not a brute-force door problem. The correct interaction is the nearby switch box.
| Symptom | Fix |
|---|---|
| M.E.G. door stays shut | Stop pressing the door and search for the switch box |
| You found a lever with interaction prompt | Use it, then return to the door |
| The door opens after the switch | Continue through the updated route |
| You are confusing it with bridge repair | Treat this as a separate M.E.G. door trigger |
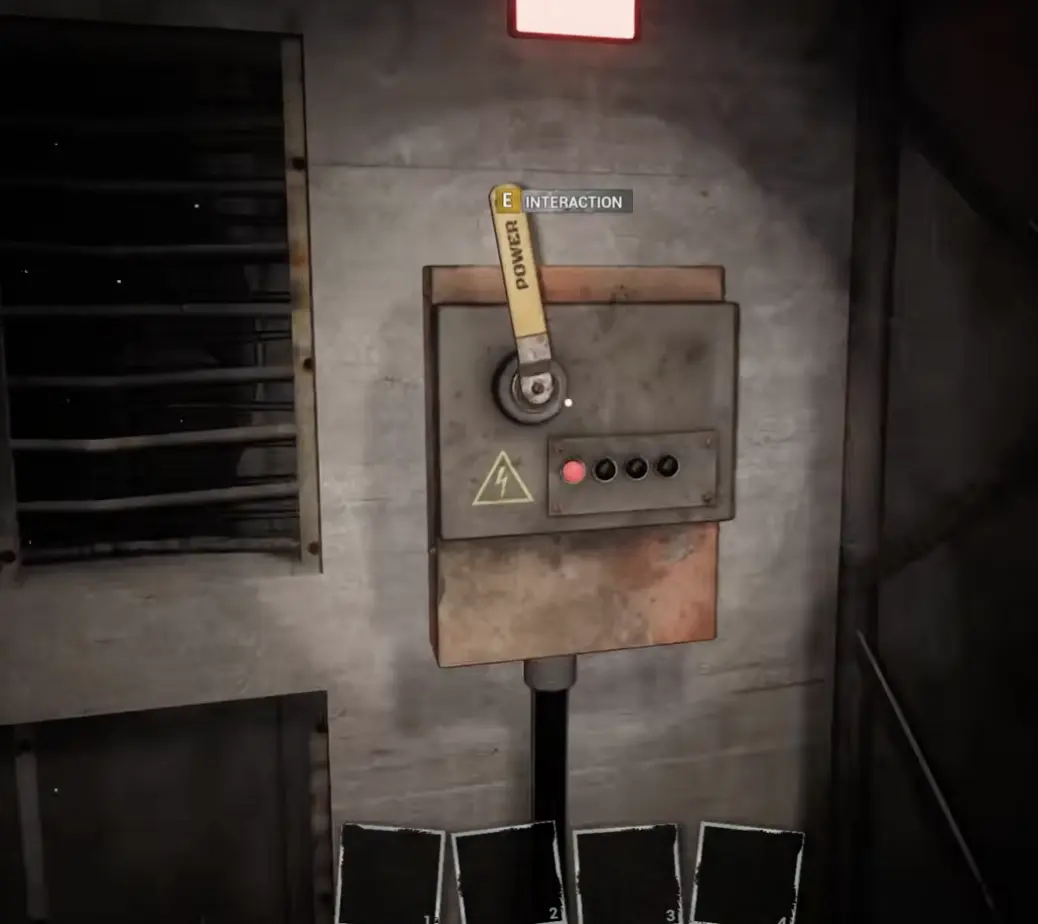
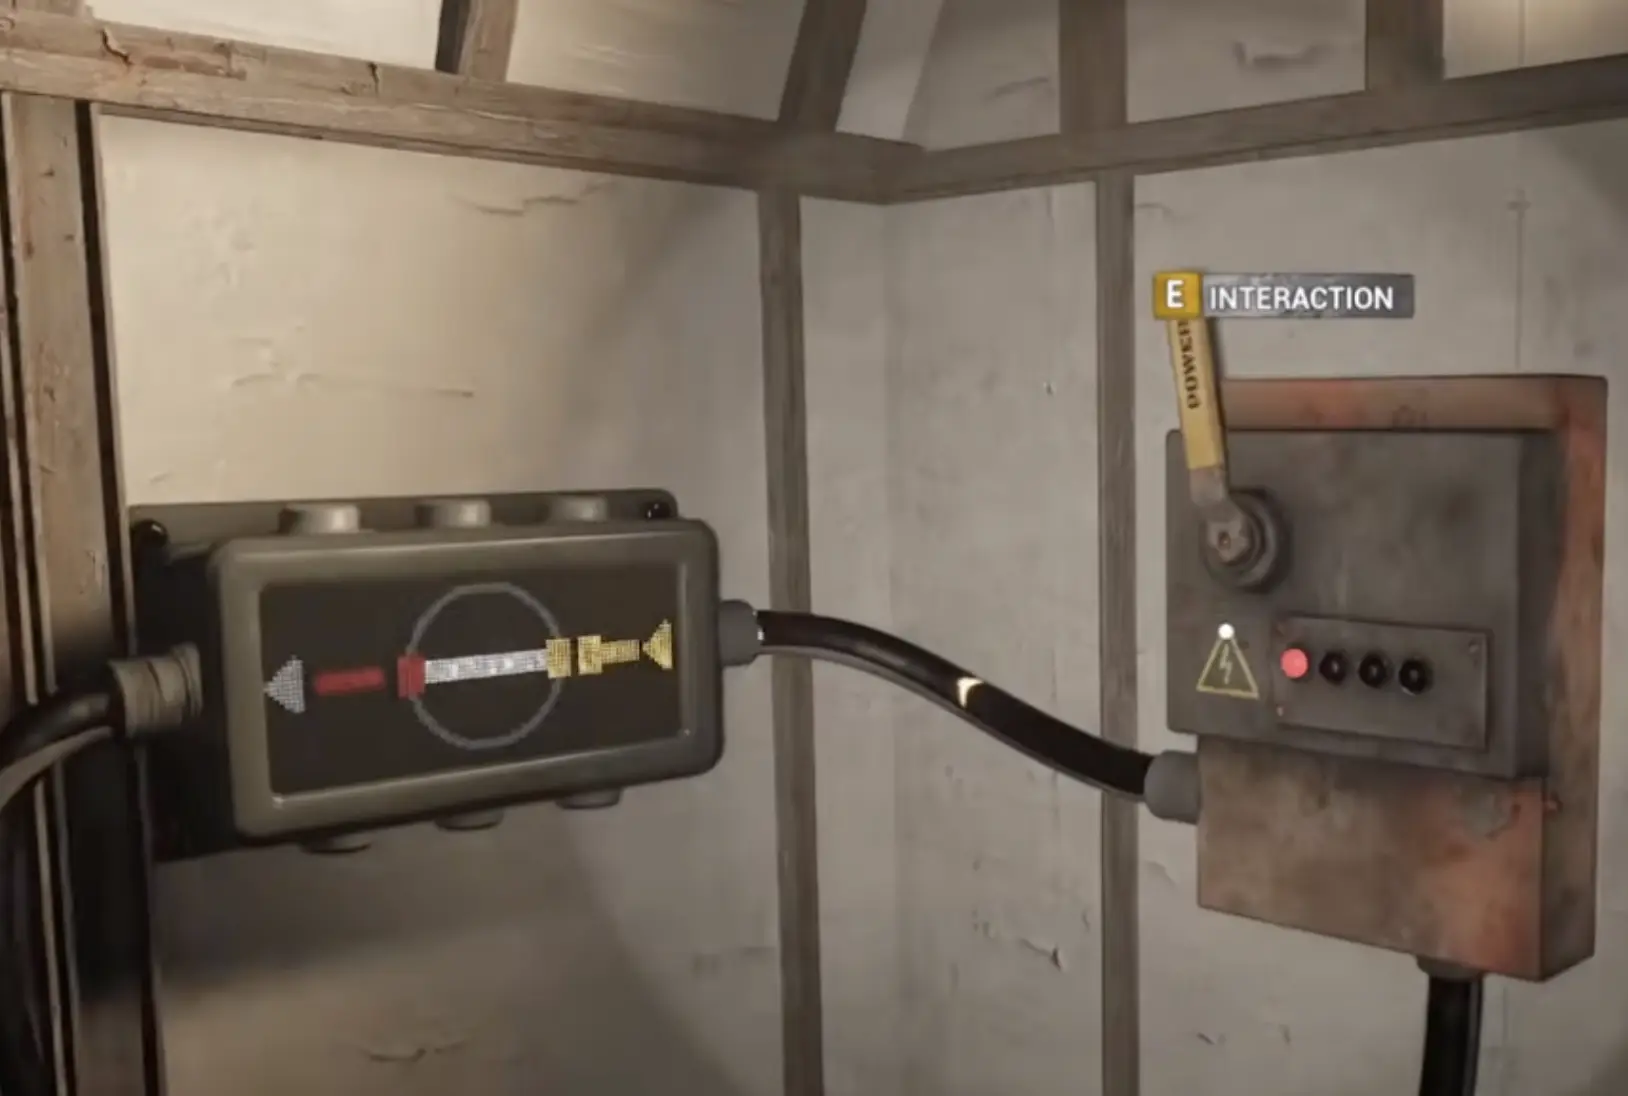
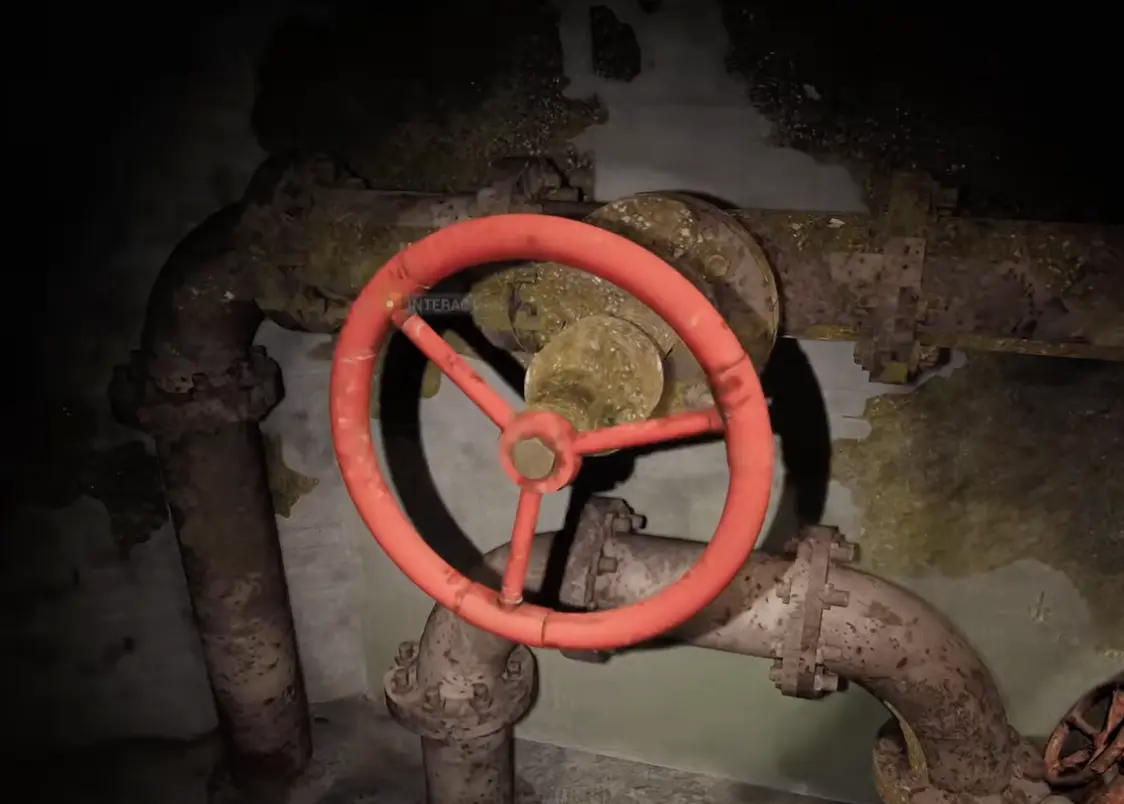
Pressure System Diagnosis
Use this section if the main door mentions pressure loss or offline power.
For the full route, use the Level 0 Walkthrough. The short version is: blocked pressure door → open electrical cabinet → pipe machinery → red wheel valve → return to hub → second pressure branch → main door.
| Door message or route clue | What it means | What to do |
|---|---|---|
| Pressure in first and second compartments has dropped | The door needs more than one pressure fix | Do not stop after one valve |
| Power is offline | The pressure system panel matters first | Use the open electrical cabinet / pressure panel |
| You see metal mesh / cage walls | You are near the pressure hub | Search for the panel before running deeper |
| You enter pipe machinery | You are on a valve route | Follow it to the red wheel valve |
| One valve is done but door still blocks you | The second compartment is still unresolved | Return to the pressure hub and search the other machinery branch |
| Door no longer complains about pressure | The route state is ready | Return to the main door and continue |
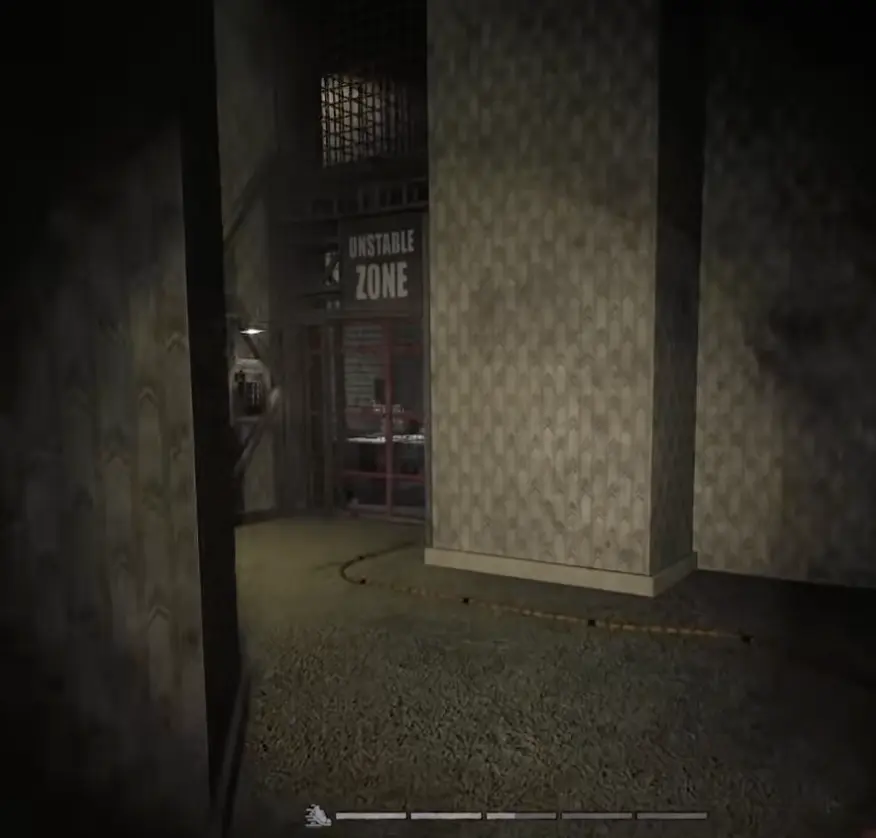
Unstable Zone and Sanity Clue Check
Use this section if the route sends you into an unstable zone or the screen becomes harder to read.
Unstable zones are not normal loot rooms. Enter with almond water, search for the clue or route update, then leave. If your inventory is full, fix that before entering.
| Symptom | Fix |
|---|---|
| Unstable Zone sign appears | Bring almond water before entering |
| Sanity drops while searching | Drink almond water instead of pushing blind |
| No clue found yet | Check walls, notes, route prompts, and nearby branches |
| Inventory is full | Clear space before entering |
| You are stuck after leaving | Return to the password display and recheck progress |
Password Clues and Partial Codes
Use this section if the password display shows partial numbers or tells you to find numbers.
A partial password is progress, not completion. For example, if the display shows visible digits and still says Find the Numbers, keep searching. Do not treat one visible number pair as the full solution.
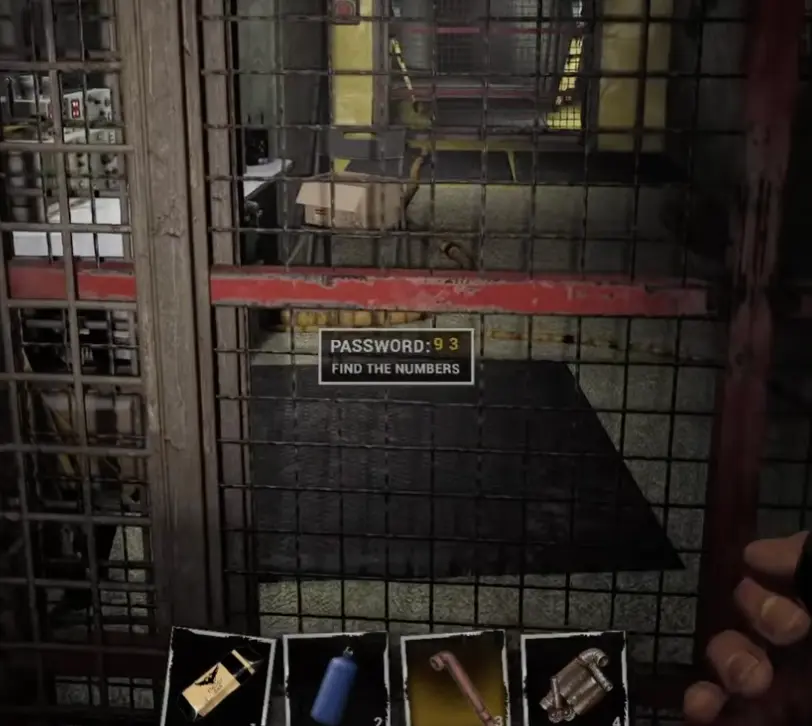
The Branch Players Skip
The branch with swarm or fly-like sounds is the key place players often avoid.
When you reach the password display, check the quiet nearby rooms first, then follow the harsher buzzing / swarm sound branch with almond water ready. The sound makes the route feel optional or dangerous, but it is part of the clue sweep. Look for number clues on walls, notes, or route prompts, then return to the display and check whether the password state changed.
| Search step | What to do | Why |
|---|---|---|
| 1 | Read the password display first | It tells you whether the code is partial |
| 2 | Search rooms immediately near the display | Easy clues can be close to the gate |
| 3 | Follow the swarm-sound branch | This is the branch players skip because it feels unsafe |
| 4 | Enter the signed unstable zone prepared | It may hold or support clue progress |
| 5 | Return to the password display | Confirm whether the visible code changed |
| 6 | Test only after enough clues are found | Guessing wastes time and sanity |
Key Card Required Gate
Use this section if Level 1 says key card required.
The item is labeled M.E.G. Access Card, even though many players call it the keycard. It is not beside the gate. You need to follow the blood trail route.
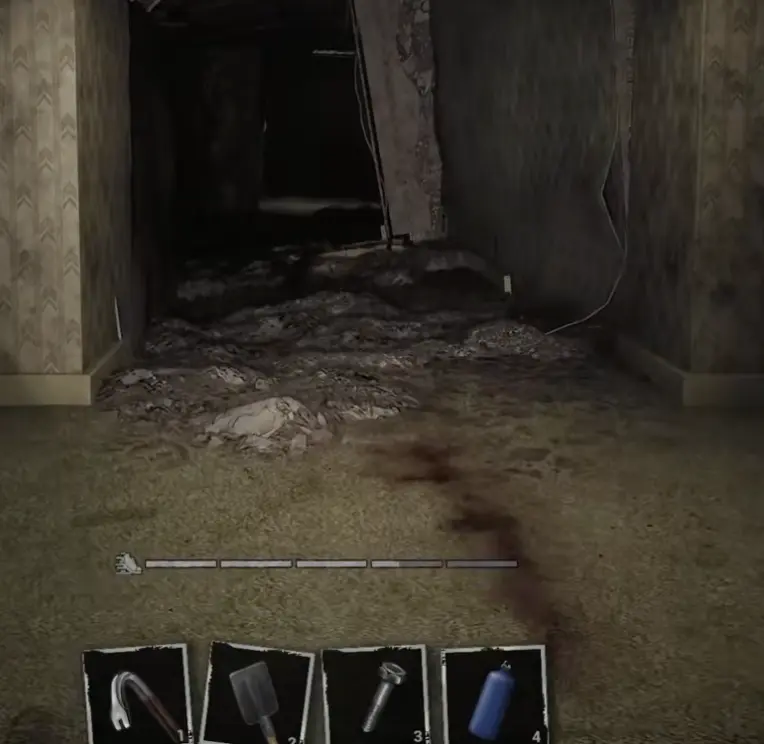
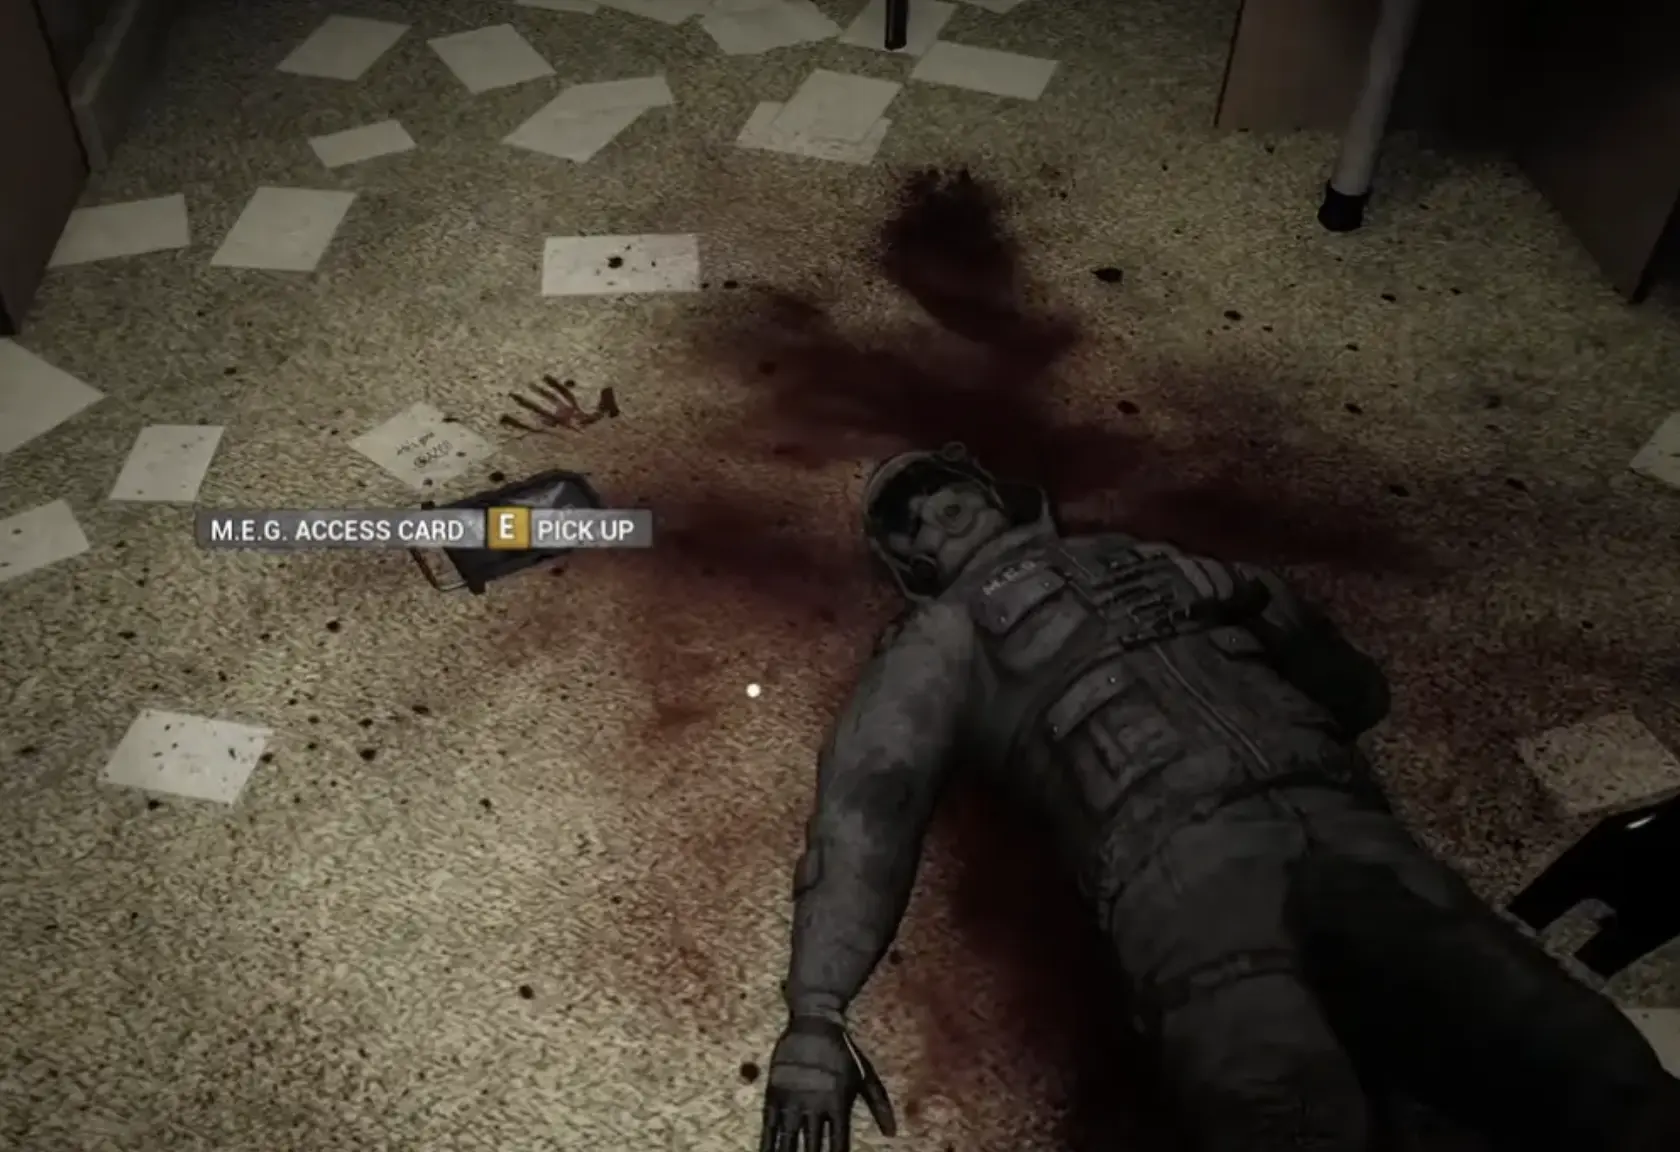
| Symptom | Fix |
|---|---|
| Gate says key card required | Stop forcing the gate and find the blood trail route |
| Blood trail seems to stop | Check the floor near the final blood marks for a small hole or drop |
| You fell back down | Return to the last clear blood mark and re-follow the trail |
| You reached a dead body | Check the floor for the M.E.G. Access Card prompt |
| Co-op team is split | Confirm who picked up the card before returning to the gate |
Generator Fuel, Key, and Button Chain
Use this section if you found the fuel reservoir but the next route still does not open.
Fuel is not the whole puzzle. Treat this route as a chain: fuel first, then the key state, then the button or control.
| Route state | What to do |
|---|---|
| Fuel reservoir appears | Refuel the system |
| Door still does not open | Look for the next key or control state |
| Button is available | Press it only after fuel and key progress are ready |
| No route update appears | Recheck the last system interaction |
| Team is carrying supplies separately | Regroup before testing the door |
Elevator Activated and Second Section Valve
Use this section if the elevator route is blocking you.
The elevator can require a survival / activation sequence before the route confirms Elevator Activated. Once it activates, do not treat that as the end of Level 1. The next section introduces a valve blocker.
| Symptom | Fix |
|---|---|
| Elevator not active | Finish the activation route and survive until the sign confirms it |
| Enemies pressure the activation | Keep moving; the goal is activation, not full cleanup |
| Elevator Activated appears | Regroup and restock before entering |
| Second section starts | Follow the new passage instead of returning to the old gate |
| Need valve appears | Search for the valve objective in the second section |
When to Use the Other Guides
This page identifies the blocker. Use the detailed guide once you know where you are stuck.
| If your blocker is… | Best next page |
|---|---|
| Opening route, backup power, bridge, pressure, Epsilon, unstable zone, password | Level 0 Walkthrough |
| Dark Zone, blood trail, M.E.G. Access Card, fuel chain, Aerostation, elevator, second section valve | Level 1 Guide |
| Achievement unlocks tied to puzzle progress | Achievements Guide |
| You want the whole cluster route | Backrooms Lost Runners Guide Hub |
Final Puzzle Advice
A blocked door is usually not asking you to click harder.
Read the message, identify the missing route state, then solve that system before testing the door again. If the blocker is too broad, use this page to diagnose it, then jump to the detailed Level 0 or Level 1 guide for the full route.
FAQ
What is this Backrooms Lost Runners Puzzle Solutions page for? +
Use this page when you are blocked by a specific door, system message, password display, keycard gate, blood trail, fuel chain, elevator, or valve objective and need to identify which puzzle system is stopping progress.
Is this the same as the Level 0 Walkthrough? +
No. The Level 0 Walkthrough gives the full route. This page is a diagnosis tool that helps you identify the blocker first, then points you to the correct detailed guide.
What should I do if a door will not open? +
Read the message or visible clue. The door is usually waiting for a route state such as backup power, M.E.G. switch, pressure, password, keycard, fuel, button, elevator activation, or valve progress.
How do I solve the pressure system? +
Start at the pressure system panel near the metal mesh / cage wall, follow the machinery path to the red wheel valve, then return to the pressure hub and check the other machinery branch before testing the main door again.
How do password clues work? +
A partial password is not the full answer. Search the rooms near the display, the dangerous branch with swarm-like sounds, and the signed unstable zone before returning to the password display.
What does key card required mean? +
It means you need the M.E.G. Access Card. Follow the blood trail route, watch for the small hole near the end of the blood path, pick up the card near the dead body, then return with the card carrier.
What should I do after generator fuel? +
Treat fuel, key, and button progress as one route chain. Refueling alone is not enough if the route still expects a key state or button interaction.
What should I do after Elevator Activated? +
Regroup and enter the elevator only when ready. After the transition, the route moves into the second section and asks for a valve.