Backrooms Lost Runners Level 1 Guide
A practical Backrooms Lost Runners Level 1 guide for players who need the Dark Zone route, key card required gate, blood trail path, M.E.G. Access Card, generator fuel, key, button sequence, Aerostation, elevator activation, second section, valve blocker, and co-op route checks explained.
Updated:
Quick Answer
Use this Backrooms Lost Runners Level 1 guide when you are blocked by the Dark Zone, key card required gate, blood trail route, M.E.G. Access Card, generator fuel, Aerostation, elevator activation, or the second section valve objective.
Level 1 Quick Route
Use this table first. The detailed sections below explain the route blockers.
| Order | Route step | What to do | Main blocker |
|---|---|---|---|
| 1 | Dark Zone warning | Restock before entering the Dark Zone route | Sanity and team split |
| 2 | Key card required gate | Stop forcing the gate and search for the card route | Missing M.E.G. Access Card |
| 3 | Blood trail route | Follow the blood upstairs and through the messy rooms | Losing the trail or falling back down |
| 4 | Small hole at the end of the blood | Use the hole as the key route marker | Walking past the correct drop |
| 5 | M.E.G. Access Card | Pick up the card near the dead body | Wrong player leaves without the card |
| 6 | Return to the gate | Bring the card carrier back to the locked route | Co-op desync / inventory confusion |
| 7 | Generator fuel chain | Get fuel, key state, and button sequence in order | Treating fuel as the whole solution |
| 8 | Aerostation | Use it as a checkpoint and regroup point | Moving on without restocking |
| 9 | Elevator route | Follow the elevator path and survive the charging / energy pressure | Low energy or split team |
| 10 | Second section | After the elevator, follow the new section until the valve blocker | Missing the next valve objective |
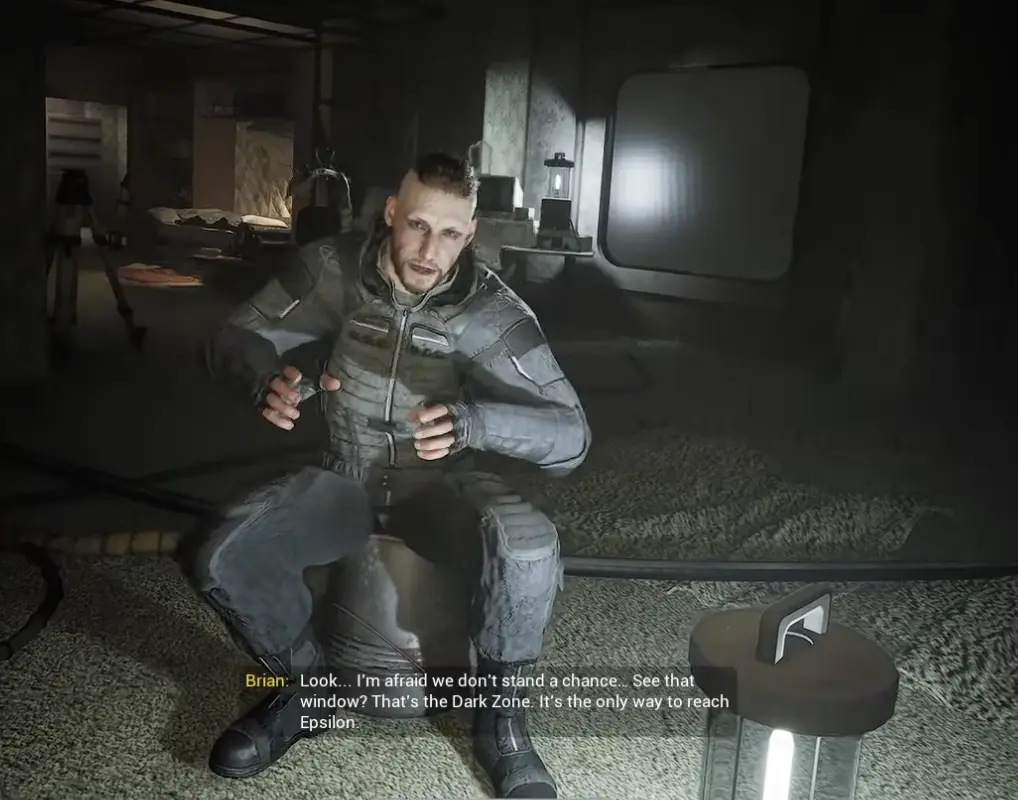
Step 1: Prepare Before the Dark Zone
The Dark Zone is introduced as the only route forward, but the dialogue also warns that it is dangerous and sanity pressure can become worse on the other side.
Do not enter while everyone is sorting inventory. Buy or share recovery, clear junk, and regroup first.
| Before entering | Good state |
|---|---|
| Sanity recovery | At least one almond water or recovery option ready |
| Health recovery | Bandage, energy drink, or similar recovery prepared |
| Inventory space | Enough room for a route item |
| Team position | Everyone knows the next path is the Dark Zone |
| Objective focus | Stop shopping or recycling once the group moves |
Step 2: Stop Forcing the Key Card Gate
When the route says key card required, that is your signal to stop testing the same gate.
The gate is waiting for the M.E.G. Access Card. Your next job is to find the card route, not to keep clicking the gate or search unrelated loot rooms.
| Gate signal | What it means | What to do |
|---|---|---|
| Key card required | You need a specific route item | Leave the gate and look for the blood trail route |
| Upstairs mention | The card route is not directly at the gate | Move toward the upper path |
| Blood marks appear | You are near the correct trail | Start following the blood instead of looting |
| No card near the gate | Normal | The card is deeper in the route |
Step 3: Follow the Blood Trail Without Losing It
The blood trail is the highest-value Level 1 route clue.
The trap is not that players miss the blood completely. The trap is that the trail passes through messy rooms, holes, and wrong-looking paths. It is easy to fall back down, lose the trail, or start looting scrap instead of following the route.
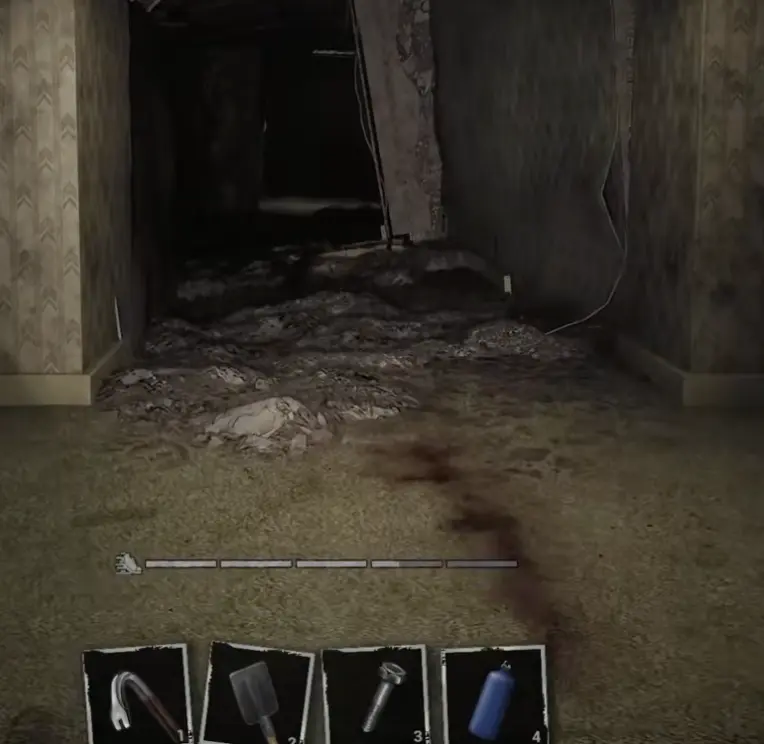
The Easy-to-Miss Blood Trail Drop
After the key card required gate, move away from the locked gate and follow the blood trail toward the upper route. Stay on the blood marks even when the path looks messy or unsafe.
The important callout is the small hole at the end of the blood. If you reach blood marks and then feel like the route disappears, check the floor and low openings before backtracking. In co-op, one player may fall back down and lose orientation; if that happens, return to the last clear blood mark and re-follow the trail instead of guessing from the lower room.
| Blood trail problem | What it usually means | Recovery |
|---|---|---|
| The blood trail seems to stop | The route may continue through a small hole or lower opening | Check the floor and wall edges near the final blood marks |
| You fell back down | You probably missed the intended drop or came through the wrong hole | Return upstairs and rejoin the blood trail from the last clear mark |
| You found scrap instead of a route item | You are looting the side room, not following the trail | Stop looting and return to the blood marks |
| The team is split | One player followed the trail while another stayed at the gate | Regroup before the pickup room |
| You reached a dead body | You are close to the M.E.G. Access Card | Check the floor near the body for the pickup prompt |
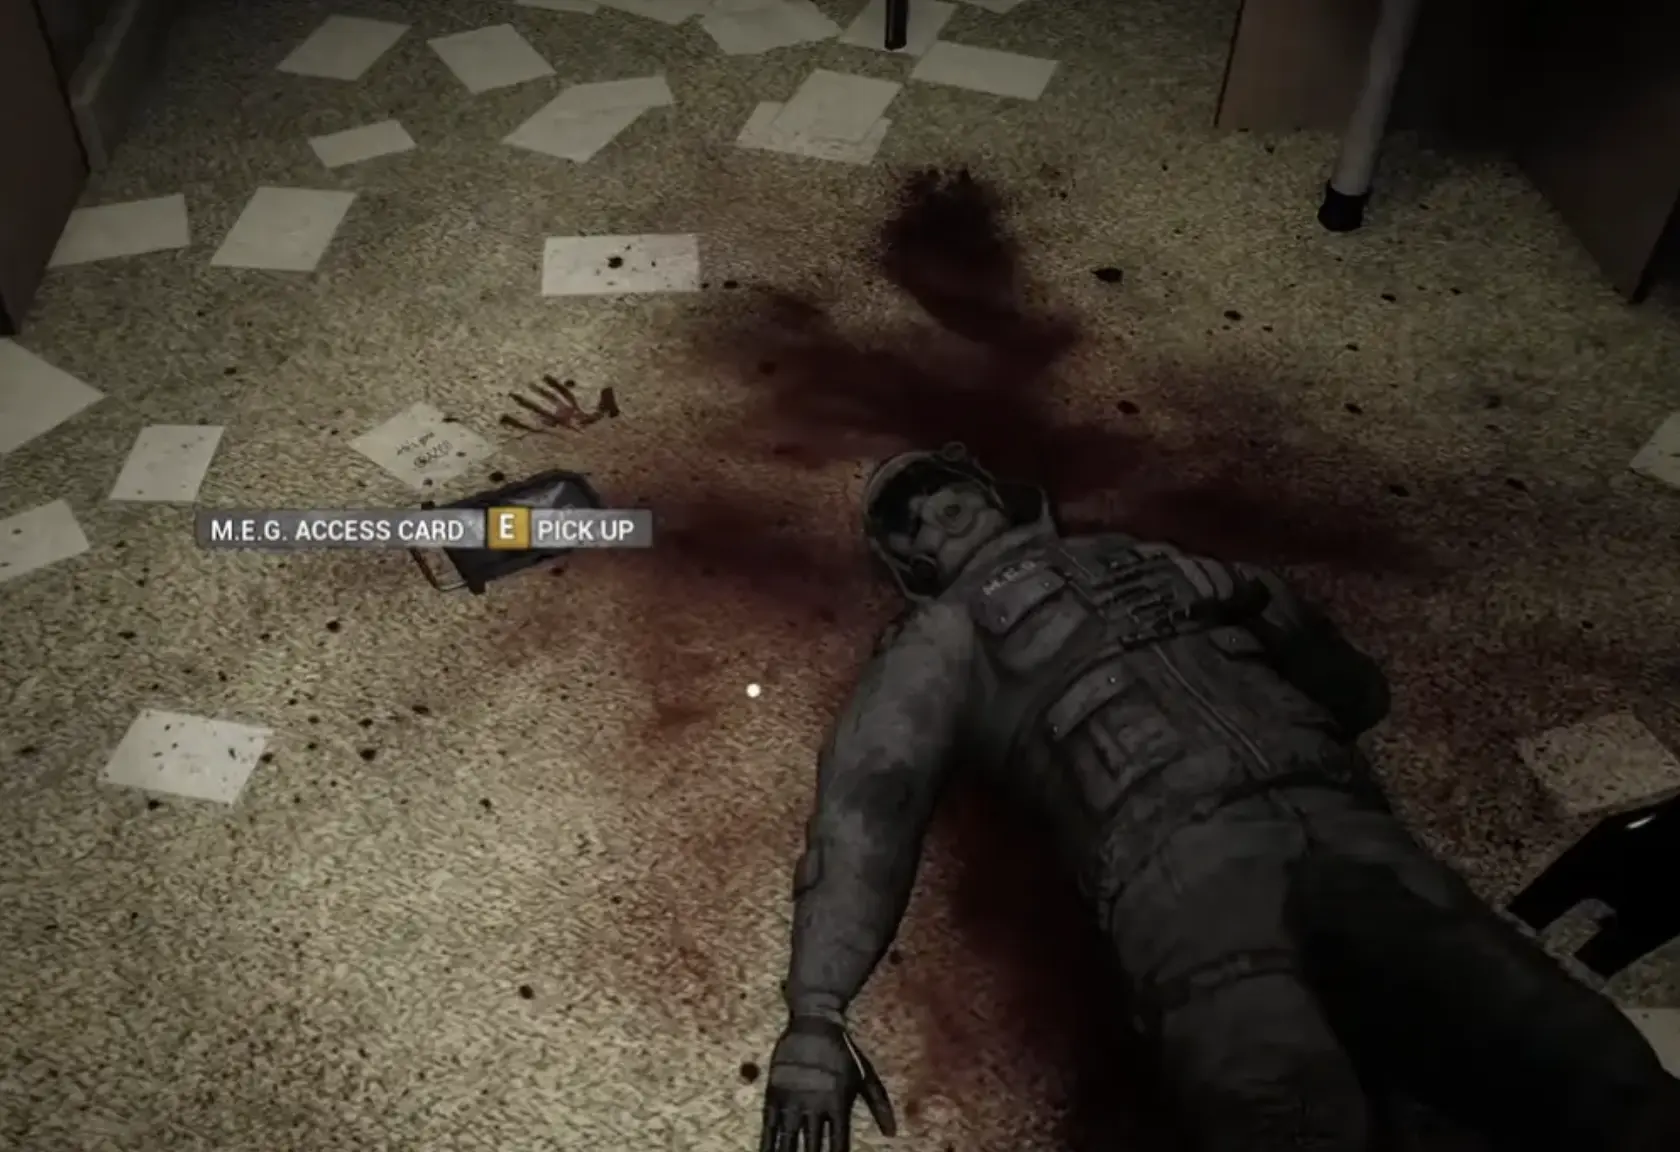
Step 4: Pick Up the M.E.G. Access Card
The keycard is the M.E.G. Access Card.
It appears near a dead body with a clear pickup prompt. This is one of the best screenshots for the whole Level 1 guide because the item name is visible in the UI.
| Check | Good answer |
|---|---|
| Pickup text | M.E.G. Access Card |
| Location clue | Near the dead body after the blood trail route |
| Before leaving | Confirm which player has the card |
| Co-op risk | The group leaves while the card carrier is behind |
| Next step | Return to the key card required gate |
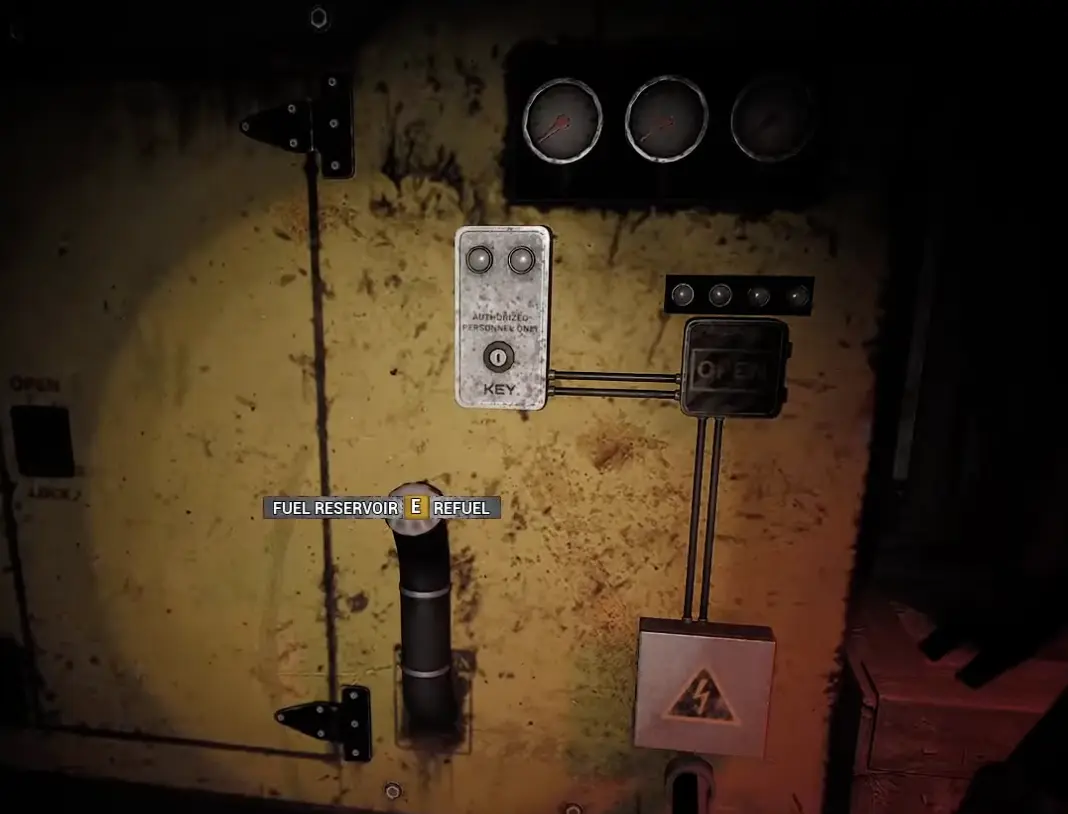
Step 5: Use the Card and Start the Generator Chain
After you return with the M.E.G. Access Card, the next route becomes a system chain.
The important line is: generator fuel, then the key, then the button. Do not treat the fuel pickup as the whole solution. The route expects several states to be completed in order.
| Order | Route state | What to do | Common mistake |
|---|---|---|---|
| 1 | M.E.G. Access Card route | Return to the locked path with the card carrier | Leaving the card carrier behind |
| 2 | Generator fuel | Find and use the fuel at the reservoir | Assuming the route is finished after refueling |
| 3 | Key state | Use the required key or key-controlled step | Missing the next interaction after fuel |
| 4 | Button / control | Press the button only after fuel and key progress are ready | Pressing controls before the route state is prepared |
| 5 | Door update | Watch for the next path to open | Running away before the route confirms |
Step 6: Route Aerostation Properly
Aerostation is not just a name in the achievement list.
It functions like a major checkpoint and route stabilization point after the harder Level 1 travel. When you reach it, you should treat it as a pause point: confirm the respawn update, restock, regroup, and decide who carries recovery before the next push.
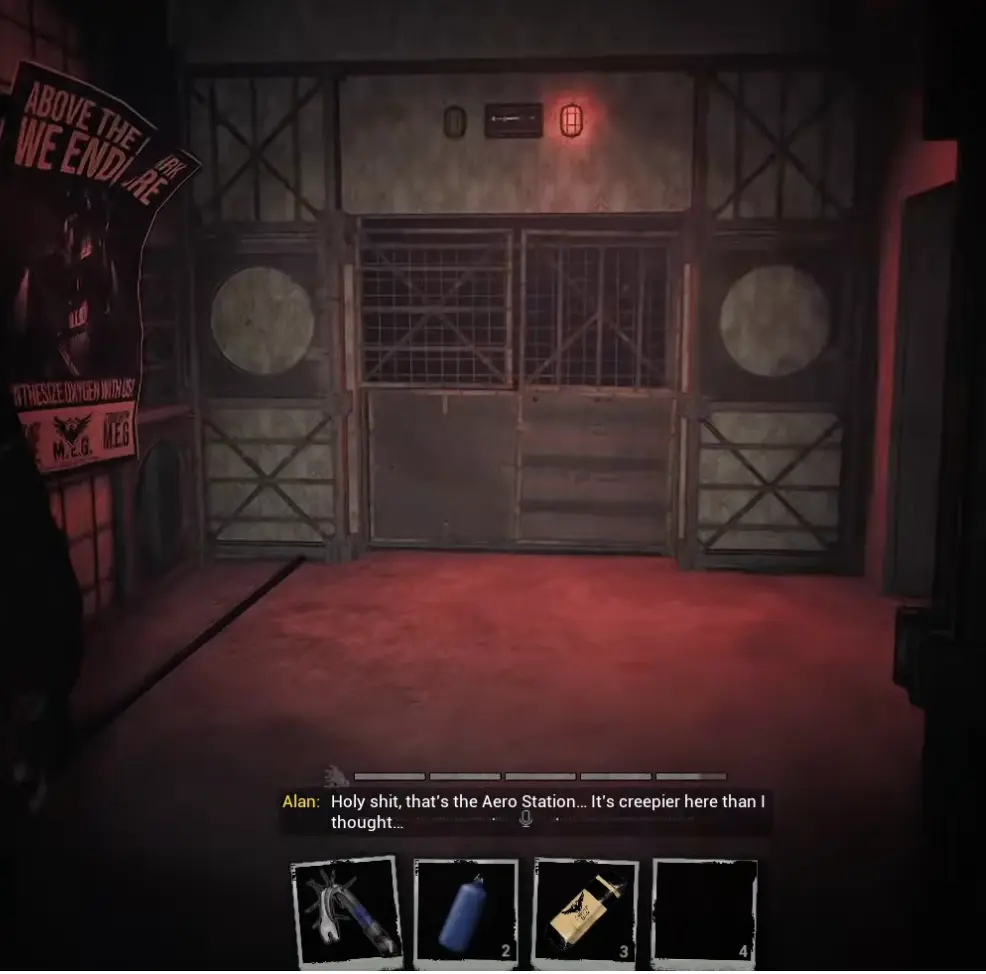
| Aerostation signal | What it means | What to do |
|---|---|---|
| “Aerostation” / station callout | You reached the station milestone | Stop and confirm the route update |
| Respawn point update | The game has accepted progress | Regroup before moving on |
| Vending or recovery nearby | You have a chance to stabilize | Buy or share almond water / energy drinks |
| Co-op voice returns nearby | Players may be close again after separation | Rejoin before the next hazard |
| Confusing parkour or portal route nearby | The route can split players again | Move one at a time if needed |
| Achievement check | Aerostation may unlock here | Check before leaving the station area |
Step 7: Find the Elevator Route
After Aerostation, the route points toward the elevator near Block B.
The useful direction callout from the route is left, straight, left, elevator. Because the area can be confusing and may include portals, parkour, vending, and loot rooms, use that sequence as your mental route back to the elevator path.
| Route clue | What it means | What to do |
|---|---|---|
| Alternate route through the elevator | The elevator is the next progression route | Stop searching unrelated rooms |
| Near Block B | You are not just returning to the old gate | Look for the elevator path |
| Left, straight, left | Practical direction callout | Use it to recover the route if you loop |
| Portal / parkour confusion | The route can move you unexpectedly | Regroup after each transition |
| Vending / recovery nearby | Final preparation chance | Stock up before the elevator sequence |
Step 8: Survive the Elevator Activation Sequence
The elevator does not simply activate after one quiet button press.
The route can involve charging, energy pressure, moth-like enemies, and repeated energy drink use. Bring energy drinks and keep moving. Once the screen confirms ELEVATOR ACTIVATED, the route state has changed.
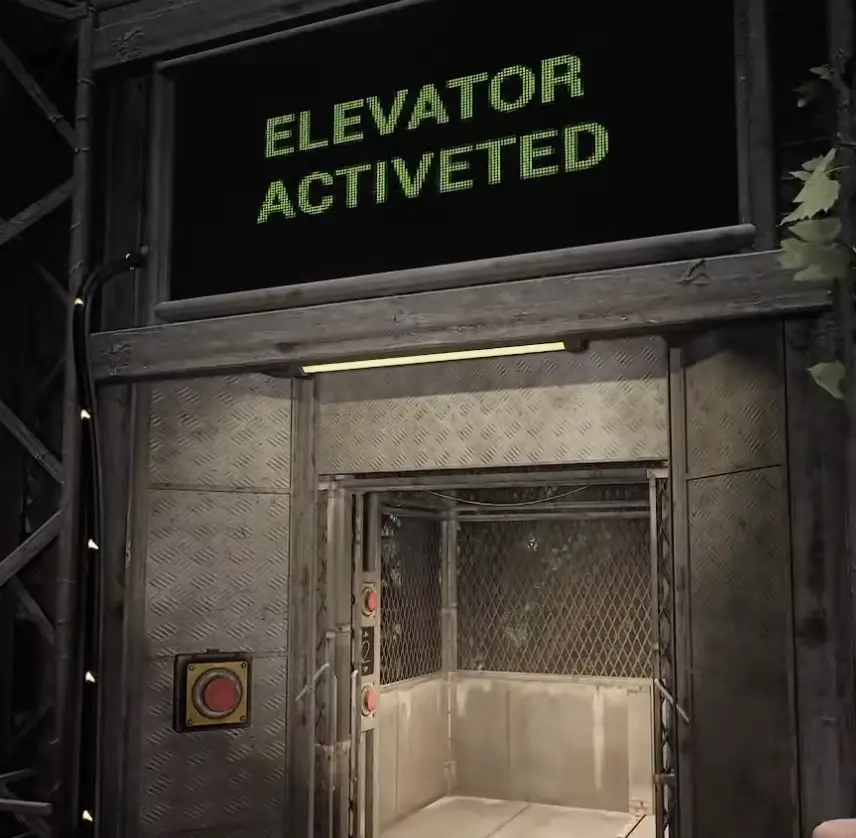
| Elevator sequence problem | What to do |
|---|---|
| Charging takes time | Keep moving and protect stamina |
| Moths or flying enemies appear | Use energy drinks and do not stand still |
| Someone runs out of energy drinks | Share before the final push |
| The elevator activates | Stop fighting unnecessary enemies and regroup |
| One player is overloaded | Drop or share supplies before entering |
| The group is split | Regroup before taking the elevator transition |
Step 9: Enter the Second Section and Look for the Valve
After the elevator, the route updates again.
You enter a damp second section, the respawn point updates, and the game points toward a deeper passage. The next blocker is simple but important: Need valve. Do not treat this as the end of the route. It is the start of the next system check.
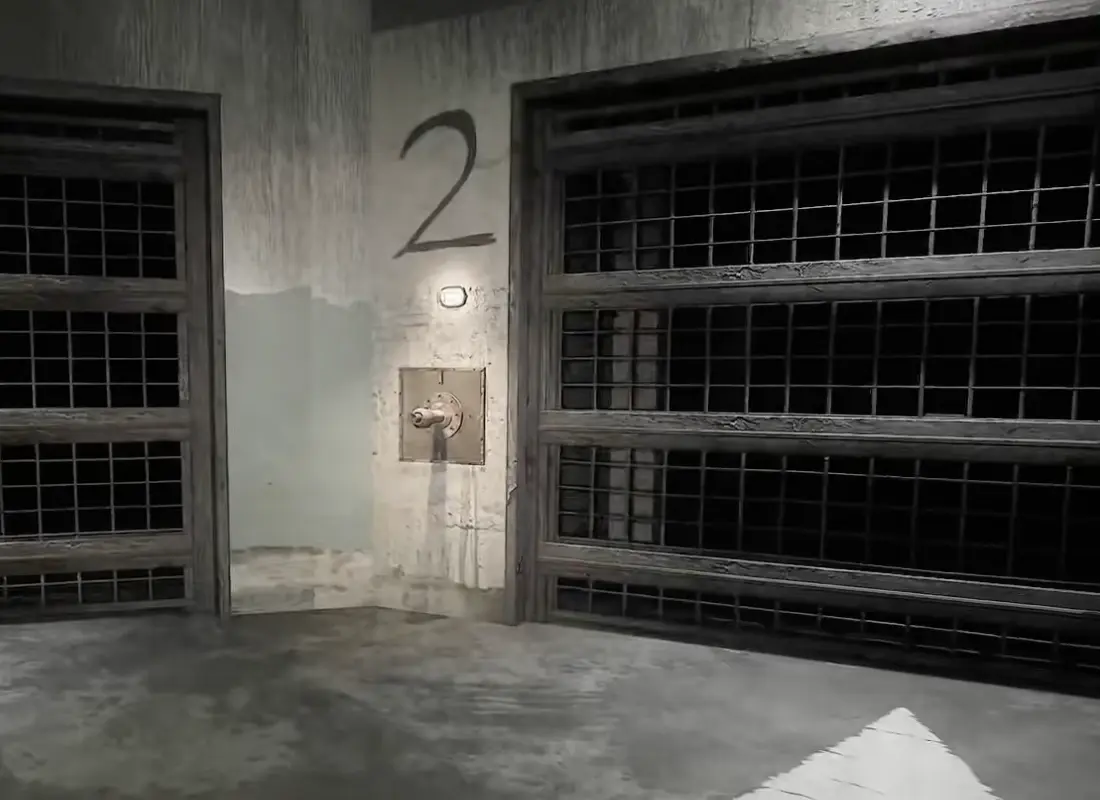
| Second section signal | What it means | What to do |
|---|---|---|
| Respawn point updated | The transition is accepted | Regroup and check supplies |
| Damp / new section | You are past the elevator route | Stop trying to return to the old gate |
| Passage deeper inside second section | The route continues forward | Follow the new passage |
| Need valve | Next blocker is a valve system | Search for the valve before forcing the gate |
| Save point / checkpoint feel | Good stopping point if needed | Save or pause after confirming progress |
Co-op Route Checks
Level 1 punishes teams that split up.
Use this checklist at the main route transitions.
| Transition | Co-op check |
|---|---|
| Before Dark Zone | Everyone has recovery and knows the route is starting |
| Before blood trail | One player leads, the others follow the same marks |
| After finding the card | Confirm who has the M.E.G. Access Card |
| Before generator chain | Card carrier, fuel carrier, and button user are not split |
| At Aerostation | Regroup and check respawn / achievement progress |
| Before elevator | Share energy drinks and recovery |
| After second section update | Confirm the valve objective before ending the run |
What to Read Next
Use the rest of the Backrooms Lost Runners cluster based on what is blocking you.
- Read the Level 0 Walkthrough if you are still stuck before Epsilon or the Level 0 exit route.
- Read the Puzzle Solutions if you need help with route-state logic, pressure systems, password clues, or unstable zones.
- Read the Achievements Guide if you are routing Aerostation, Level 1: Habitable Zone, Survivors Camp, Run. Just Run, or Level 1 “Parking Zone”.
- Return to the Backrooms Lost Runners Guide Hub if you want the full guide cluster route.
Final Level 1 Advice
Level 1 becomes manageable when your team treats every major blocker as a route-state problem.
If you get lost, do not split up and search every loot room. Return to the last confirmed route state — the key card gate, the last blood mark, the M.E.G. Access Card pickup room, Aerostation, or the elevator — then rebuild the route from there. In co-op, the fastest recovery is usually regrouping first, checking who carries the required item, and only then pushing the next door.
FAQ
Where do I go after Brian points out the Dark Zone? +
Prepare first, then use the Dark Zone route as the main path forward. Bring sanity recovery, clear inventory space, and keep the group together because the route becomes more dangerous after this point.
Where is the keycard in Backrooms Lost Runners Level 1? +
The keycard is labeled M.E.G. Access Card. After the key card required gate blocks you, follow the blood trail route, look for the small hole at the end of the blood path, then recover the card near the dead body.
Is the M.E.G. Access Card the same as the keycard? +
Yes. Players usually search for it as the keycard, but the pickup text says M.E.G. Access Card.
How do I follow the blood trails? +
Start from the blocked key card route, follow the blood trail upstairs and through the messy rooms, then watch for the small hole at the end of the blood path. If you fall or lose the path, return to the blood marks and re-follow them instead of wandering randomly.
What do I do after finding the M.E.G. Access Card? +
Return to the key card route with the player who picked up the card. In co-op, confirm who has it before the group leaves the pickup room.
What is the generator fuel, key, and button sequence? +
Treat the generator fuel, key, and button as one route chain. Refuel the system, use the required key or control state, then press the button or switch only after the route is ready.
What is Aerostation? +
Aerostation is a major later-route checkpoint and respawn update. Use it to regroup, restock, and confirm progress before the elevator route.
What should I do after Elevator Activated? +
Enter the elevator only after restocking. After the transition, the route updates into the second section and asks for a valve, which becomes the next blocker.