Tape to Tape Squads Guide
Featured
Which Tape to Tape Squad Should You Pick?
Compare all 19 Tape to Tape squads, learn their unique rules and strategies, and find out which team suits your next campaign run.
Read Guide →Game Guide Hub
Beat all three Acts in Tape to Tape 1.0, choose better rewards, manage your lineup, and prepare for the final Golfers boss.
Recommended Order
Use these guides to find the right Tape to Tape walkthrough, solution or next step.
Squads Guide
Compare all 19 Tape to Tape squads, learn their unique rules and strategies, and find out which team suits your next campaign run.
Achievement Guide
Track all 108 Steam achievements in Tape to Tape, complete the eight Benchwarmer Quests, and tackle difficult scoring, knockout, and squad challenges.
Guide Cluster
Compare all 19 Tape to Tape squads, learn their unique rules and strategies, and find out which team suits your next campaign run.
Read Guide →Track all 108 Steam achievements in Tape to Tape, complete the eight Benchwarmer Quests, and tackle difficult scoring, knockout, and squad challenges.
Read Guide →Start Campaign → New Run, choose a squad, and enter Act 1: Tentacle Valley. Take your opening Coach Relic, arrange your active skaters in Edit Lineup, and follow the map toward the Act Boss. Win the Boss match to reach King’s Land, then clear The Promised Land and defeat the Golfers to finish the campaign.
Tape to Tape’s campaign is built around three Acts, but winning individual hockey games is only half the challenge. The team that reaches the Golfers is shaped by every player you recruit, every upgrade you assign, and every risky match you choose along the way.
A run can start with an excellent shooter and still fall apart when that player becomes too slow to find open ice. A skater who looked expendable early can become essential after spending several games on the Bench. Powerful Relics can also work against your lineup when their drawbacks interact with injuries, size, or scoring conditions.
The 1.0 campaign has new routes, opponents, and a challenge-based progression system. Results from the earlier campaign no longer describe every current mechanic. The important decisions below follow the three-Act journey while accounting for the randomized encounters and rewards that make each attempt different.
Open Campaign, rather than Play Now or Free Practice, when you want to progress through the three Acts and unlock more campaign content.
For a first clear, Vanilla is a sensible choice because it keeps the standard lineup, Bench, and injury systems. Other squads change how you score, defend, or manage players, so check the squad rules and starting options before committing to a different team.
Pro is a useful difficulty for players who already know the basic controls and want to work toward progression challenges that specify Pro victories. However, learning the campaign on a more forgiving setting can be more productive than repeatedly losing early Elite matches.
The practice modes are useful when you are still learning passing, player switching, shooting, and body checks. Spend enough time there to recognize which button controls each action, especially when using a controller layout with unfamiliar prompts.
In an actual match, look at which skater you currently control and where your teammates are positioned before forcing a pass. An attempted shot can be interrupted by a defender, a poorly timed pass can leave the puck behind the intended receiver, and a missed body check can put your defending player out of position.
You should also check the camera and player-switching settings. Keeping a consistent attacking direction can make orientation easier, while simplified player switching may feel more comfortable when learning to defend.
These are preference settings rather than requirements for winning. The most useful arrangement is the one that lets you identify the puck carrier and switch to the correct defender without losing track of the play.
Tentacle Valley begins with a visit to the Coach. The first significant decision is choosing a Relic.
Relics can change the entire team’s behavior or create a lasting advantage throughout the run. The available choices vary, so there is no fixed opening Relic that every player will receive.
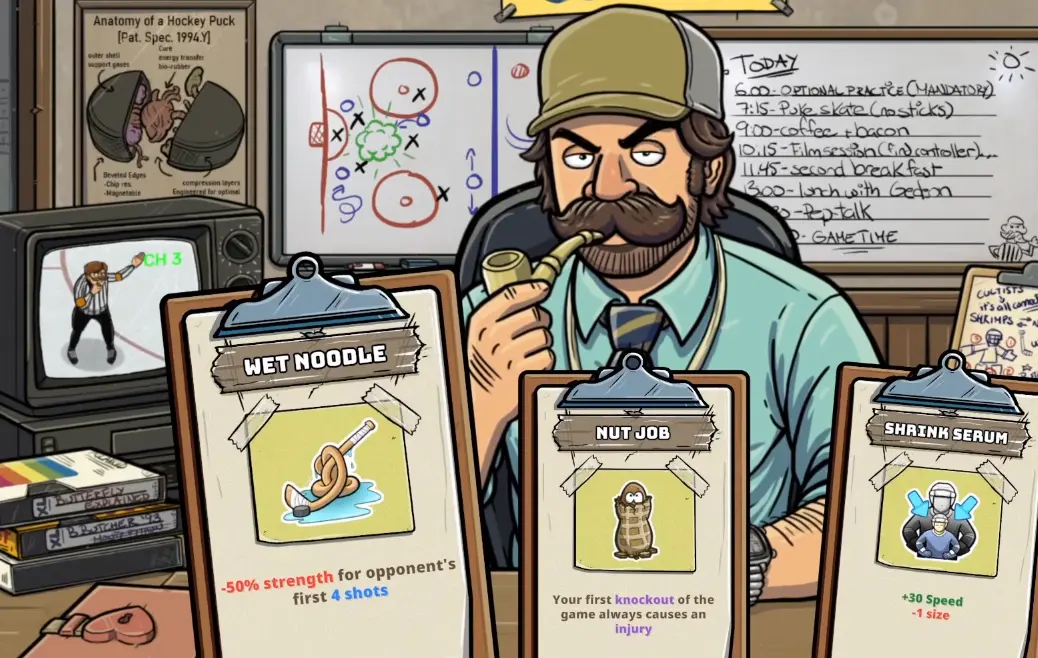
One opening selection offered three substantially different effects:
Each supports a different approach.
Wet Noodle is helpful when you want additional protection while learning how the opposing team attacks. Nut Job becomes more appealing when you already expect to land body checks regularly. Shrink Serum can improve mobility, but a smaller player may require different positioning when dealing with stronger opponents.
Choose the effect you can actually use with your roster. An impressive Checking bonus has little value if your preferred playstyle rarely creates successful body checks, while an offensive effect may not compensate for poor defensive positioning.
After taking the opening Relic, inspect Edit Lineup.
The most useful information appears in four attributes:
A high-OVR skater is not automatically the best choice for every position.
Look at the player’s actual strengths and the abilities attached to that skater. A powerful shooter can contribute more when positioned to receive passes near an open shooting lane. A physically stronger player is useful in situations where contact occurs frequently, but may struggle to turn a loose puck into a breakaway if Speed is low.
The game also displays Talents, Abilities, Modifiers, and the currently equipped Relics. Inspect Modifiers when a player seems much stronger or weaker than their basic attributes suggest. Relics and other active effects can change the practical result.
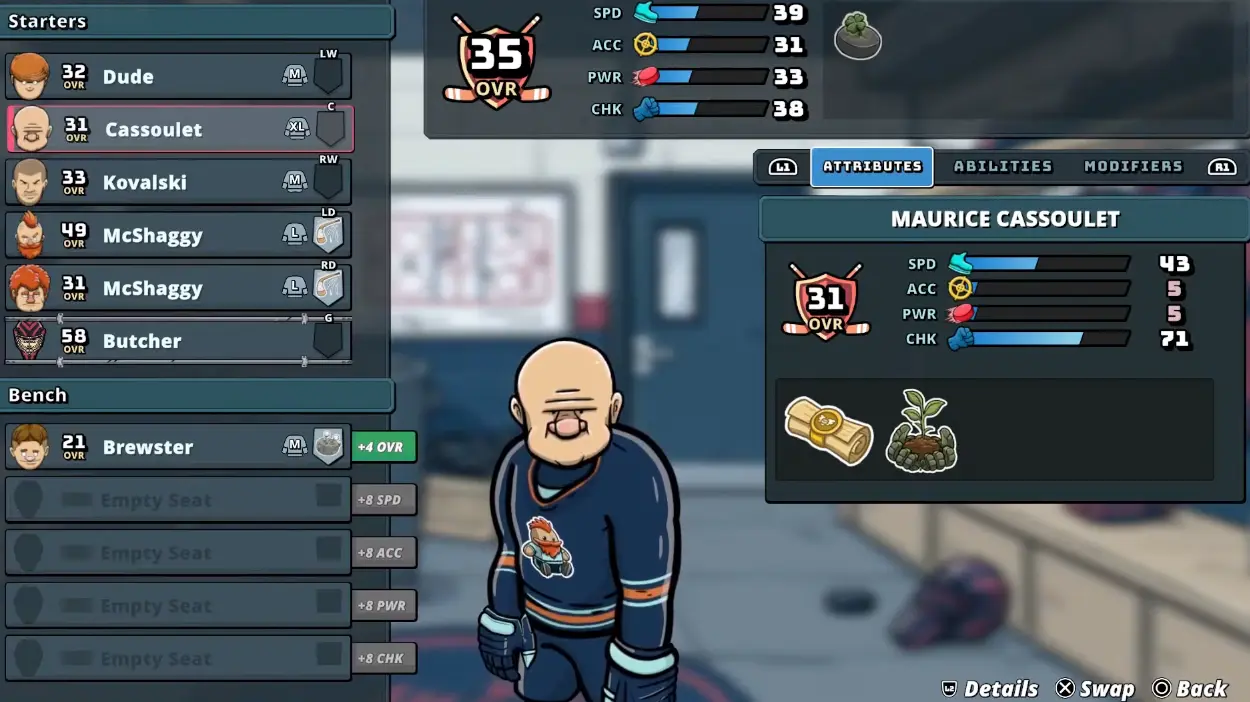
In the normal campaign lineup, reserve players occupy Bench slots and gain the attribute bonus associated with their position after sitting out a game. One early lineup displays a +4 OVR bonus for Buster Brewster, alongside available slots granting +8 Speed, +8 Accuracy, +8 Shot Power, or +8 Checking.
Those slots are not interchangeable. A slow skater benefits more from the Speed slot when mobility is the main weakness, while a player already reaching scoring positions may gain more from Shot Power. Compare the available bonuses before assigning someone to the Bench.
The first question is whether your starting lineup can already beat the next opponent. If it can, consider developing a weaker reserve through the Bench instead of forcing that player into an active position too early.
A slow shooter might benefit from an appropriate growth slot before becoming part of your starting offense. A reserve who already has useful Checking or passing abilities may need a different attribute improvement.
Before every important match, inspect who is active and who is sitting out. A skater gaining bonuses on the Bench does not contribute those attributes to the current on-ice lineup.
Later, when the roster includes more Free Agents and Benchwarmers, this distinction becomes one of the main ways to strengthen your team without sacrificing the entire run.
Each branching path can offer different opponents, rewards, and events. The first objective is to understand what you must win and what the selected encounter will award.
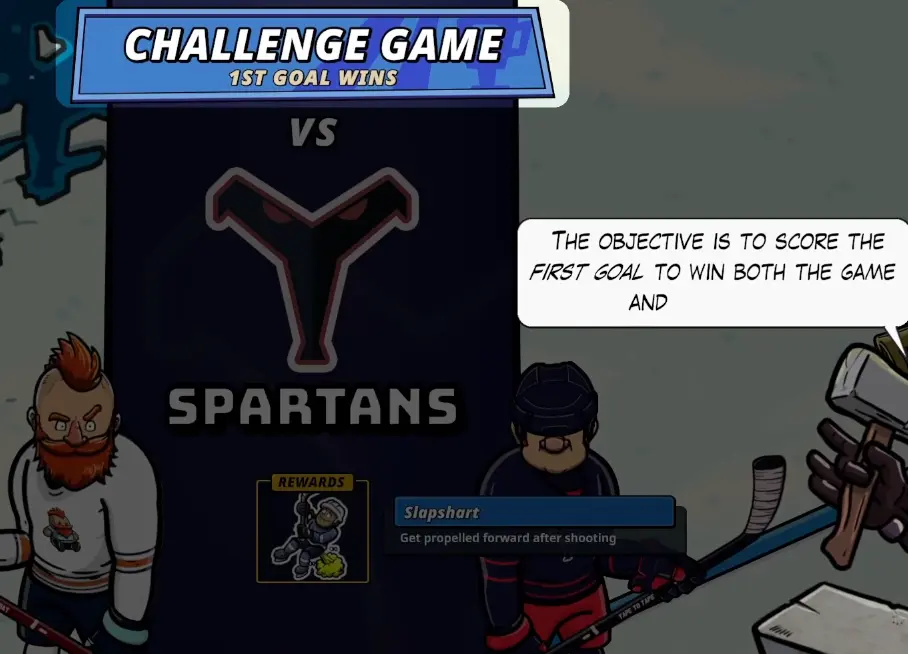
An early Challenge match may be decided by the first goal. Another encounter can require reaching a particular score advantage, while a Boss match lasts several periods.
These are not interchangeable objectives.
A first-goal Challenge rewards a quick, reliable opening attack. A match requiring a larger lead needs more consistent scoring and enough defense to prevent the opponent from keeping pace. An Elite encounter may offer stronger progression rewards but puts the run at risk.
The opening portion of Tentacle Valley provides a useful example.
One early Challenge against the Spartans offered Slapshart, a reward that propels the skater forward after shooting. The objective was First Goal Wins, so a single successful scoring play ended the match and secured the reward. After winning the opening possession and scoring, the player earned the reward and assigned it to a selected skater.
The result depended on two decisions: taking a match that could end quickly, and giving the reward to someone likely to use it.
There is no universal reward order that works for every run. Your current lineup determines which opportunity is most valuable.
Take a Challenge reward when its Talent or Power-up immediately improves a player you rely on. A Slapshot enhancement is much less attractive when your main scorer rarely has room to wind up.
Choose Training when a small attribute improvement addresses a real weakness. Speed can help a player who repeatedly fails to reach open space, while Shot Power matters more when positioning is already good but shots lack force.
Recruit a Free Agent when your lineup has a role nobody can perform reliably. A strong recruit can improve the current match immediately, especially when they bring a useful Ability or Talent.
There is an opportunity cost to every choice. Spending a route on another minor upgrade can leave a serious roster weakness unresolved. On the other hand, recruiting a new player whose abilities duplicate your existing starters may contribute less than strengthening a skater you already use effectively.
Some Power-ups apply to one specific skater rather than the entire team.
When the reward screen asks you to choose a recipient, check the current lineup before confirming. Giving a shooting effect to someone who rarely takes shots may waste the reward’s main benefit.
A player-focused upgrade is most useful when its trigger naturally occurs during that skater’s role.
A skater regularly shooting from the blue line can use a shooting-related effect. A player positioned for rebounds benefits from an effect that improves those opportunities. A slower checker may become more dangerous with increased contact strength, but improving that player’s Speed could be more urgent if they struggle to reach opponents.
Avoid assigning every new reward to the same skater simply because that player currently has the highest OVR. A balanced team can be more reliable than one exceptional scorer surrounded by teammates who cannot recover the puck.
Elite opponents appear throughout the campaign. They are stronger than ordinary teams and can feature unusual players, abilities, or physical advantages.
One early Elite encounter warns about Rory McShaggy’s heavy hits and the imposing Bear Grohl. Trying to body-check the largest opponent repeatedly can waste possession and leave your own skaters exposed.
Look for open passing lanes instead of treating every opposing skater as someone you must knock down. Move the puck before the checker reaches the carrier, and take a shot when the defense has committed to the wrong side.
The consequences of losing an Elite encounter also matter. During the opening campaign tutorial, the game explicitly warns that a defeat ends the current run.
A failed challenge objective is not necessarily the same as losing the match. In one early encounter, the team won the hockey game but did not satisfy the additional scoring condition. That meant the desired challenge result was missed despite the ordinary victory.
Before entering, read the exact match objective and reward panel. When you need a specified lead, make sure the scoreboard reaches that margin rather than assuming a normal win satisfies the challenge.
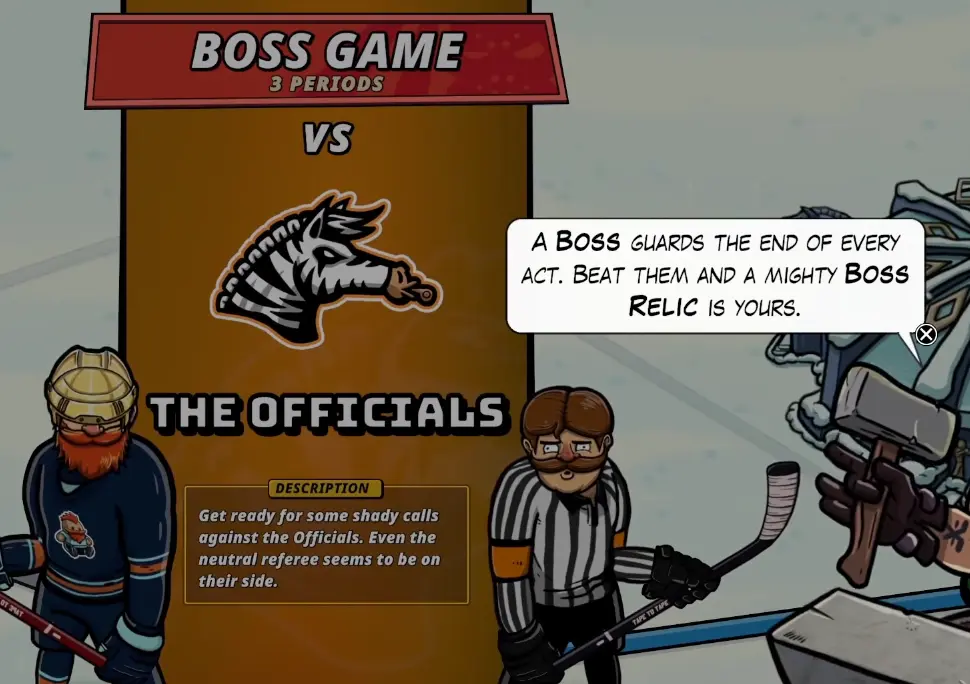
The end of Tentacle Valley is guarded by an Act Boss.
Unlike a short First Goal Wins encounter, the Boss fight uses a three-period match. Victory awards a Boss Relic and advances the campaign into the next Act.
Before entering, use Edit Lineup to confirm that your intended scorer is active and that the rest of the team can protect possession.
A short Challenge might be won by creating one excellent shooting opportunity. Over three periods, a lineup needs to repeat that process while responding to turnovers, rebounds, and opposing counterattacks.
The game can become particularly dangerous when your offense consists of one skater carrying the puck through multiple opponents. Once that player is knocked down, there may be nobody well positioned to stop the resulting rush.
Use passing to create the opening before taking the shot. When a goalie leaves a rebound, a nearby teammate can finish the chance without requiring another full rush from your own end.
After the Boss victory, collect the offered reward rather than rushing through the transition screen. The next Act opens with another significant Relic choice, and the value of that choice depends on the team you have already built.
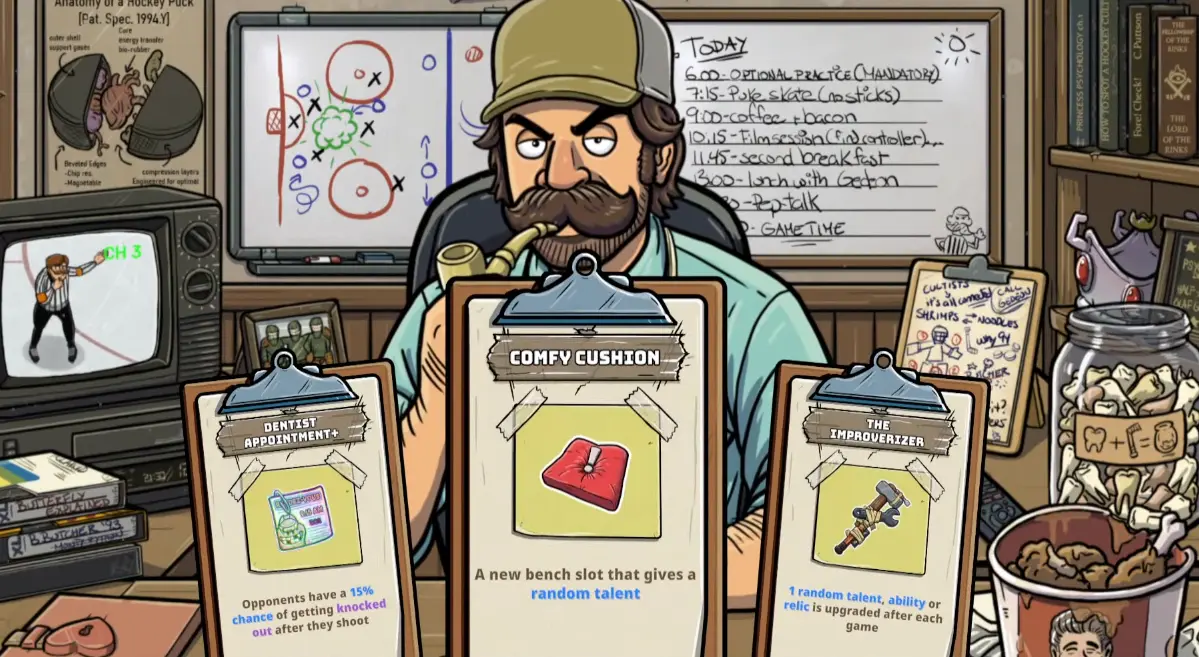
King’s Land opens with another powerful Relic choice immediately after the Act 1 Boss. One selection offered a new Bench slot that grants a random Talent, an effect that upgrades one random Talent, Ability, or Relic after every game, and a third option giving opponents a 15% chance of being knocked out after shooting.
The random-upgrade option was selected for continued growth across later matches. With several encounters still ahead, repeated improvements could benefit multiple parts of the lineup, whereas the knockdown effect depended on opponents taking shots. The choice becomes less attractive when your current run needs an immediate defensive improvement rather than additional long-term growth.
At the beginning of Act 2, reopen Edit Lineup.
Compare your initial stars with the players who have accumulated upgrades during Tentacle Valley. The best skater at the beginning of the run may no longer be the player offering the most useful combination of attributes and abilities.
A Benchwarmer who has received repeated bonuses may now be ready to replace a weaker starter. A new Free Agent can also provide an ability that fills a missing role.
Make the substitution when the replacement produces a clear improvement in your current lineup, not merely because their displayed OVR is higher.
Shot Power without good positioning may produce very few real opportunities. Exceptional Speed becomes less useful when a player repeatedly overskates the puck or leaves the defensive zone unprotected.
Your goal by the middle of King’s Land is to have at least one dependable way of scoring and enough support to create that chance repeatedly.
King’s Land can create situations where an unusual Relic changes the value of a scoring play.
One run offered Pain Points, an effect that made goals scored by injured skaters count as three goals. The choice was attractive because the team already had a skater whose existing setup benefited from remaining injured.
However, the effect also applied to the opposition in that encounter.
That changes the risk calculation. A three-goal scoring effect can end a match quickly when your designated player finishes the attack, but it also makes an opposing goal much more dangerous if their players can trigger the same condition.
Review both sides of the effect before treating it as a guaranteed advantage.
The broader lesson is that a Relic’s value depends on your current team state. An injury-related bonus is much less useful when none of your active players can reliably exploit it, and it may be actively harmful when the opponent benefits more often than you do.
King’s Land includes challenging opponents such as the Crusaders, whose heavily armored players can make ordinary physical pressure less effective.
Watch how the opposition organizes itself. An armored defensive formation can be easier to attack by moving the puck across the ice than by skating straight through the center.
When a defender commits to your puck carrier, transfer possession to a teammate with a clearer path toward the goal. Against physically strong opponents, finishing a clean pass can be more dependable than trying to win every body-check exchange.
Pay particular attention to the goalie after the initial shot. If the puck remains loose, keep a second attacker close enough to pursue the rebound, but do not send every player forward and leave the opposing team a free counterattack.
A strong offensive ability does not remove the need to make the goalie move or create a shooting lane.
Later in King’s Land, reassess your most important weaknesses.
A team that scores regularly but struggles to catch opposing puck carriers may gain more from Speed or defensive improvements than from additional Shot Power.
A team that creates numerous high-quality chances but cannot finish them may benefit more from Accuracy, Shot Power, or a compatible shooting effect.
This decision should be driven by what has happened in recent matches. Look at the chances your players are actually creating instead of automatically choosing whichever reward displays the largest numerical bonus.
Before the Act Boss, check injuries and the current lineup once more. A player who has become essential to your scoring may require protection or support, while a well-developed reserve may be ready to take the ice.
Win the Boss match to advance to Act 3: The Promised Land.
The Promised Land is the final Act. Your team should now have several layers of upgrades, but that can introduce a new problem: bonuses do not always work together as expected.
Some builds become extremely powerful on one skater while leaving the rest of the team behind. Others improve attributes that have diminishing practical value because of the player’s role or positioning.
The late-game decision is not simply to take the largest available number. You need to make sure every major upgrade contributes to a real scoring, puck-recovery, or defensive situation.
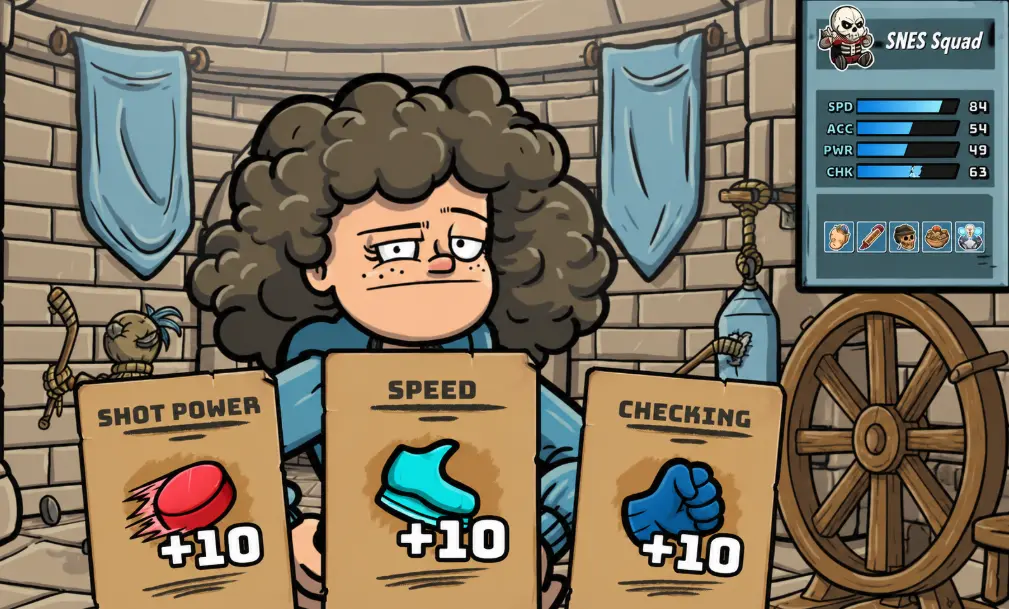
At Team Training, compare the offered attribute increases against the squad’s current weaknesses. One selection offered +10 Shot Power, +10 Speed, or +10 Checking, with the squad showing 84 Speed, 54 Accuracy, 49 Shot Power, and 63 Checking before the choice.
The lineup already contained players with useful shooting attributes. The immediate Shot Power increase also failed to reach an anticipated bonus threshold for the players being considered.
Team Speed was chosen instead.
This is an important late-game distinction.
A player who takes a strong shot only after reaching a good position still needs enough mobility to reach that position. More Shot Power does not help much when the skater cannot receive a pass cleanly or arrives too late to finish a rebound.
Conversely, a fast skater with very weak shooting may need additional Power or Accuracy before extra Speed produces more goals.
Inspect your current attributes and the conditions attached to active bonuses before choosing. Some upgrades trigger additional effects when particular thresholds are reached, while others impose penalties under certain match conditions.
Those interactions can matter more than the immediate number displayed on the reward.
As you approach the final encounter, decide which skaters will produce most of your goals and how the remaining players will support them.
A successful late-game lineup can have one or two primary offensive players, a reliable passer or puck carrier, and enough defense to survive turnovers.
The goalie also deserves attention. Bobby Butcher can remain useful across a winning run even without the most elaborate set of Talents. In one completed campaign, his final recorded save percentage was approximately .902, alongside a 1.2 goals-against average.
Those numbers describe that particular completed run, not a guarantee that the goalie will reproduce them with another lineup.
If a better goalie or defensive upgrade appears, judge it against your actual problem. A goalie struggling with loose rebounds needs a different kind of help from one facing uncontested shots because the defense has repeatedly abandoned the zone.
The Golfers are the final opponents of the campaign.
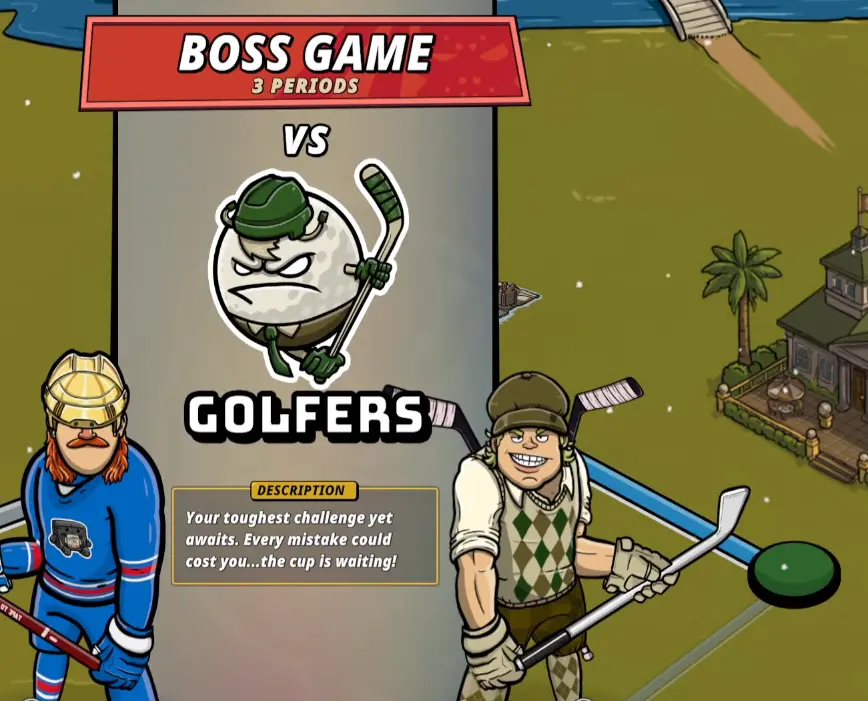
You face them after progressing through The Promised Land, with the accumulated strength and weaknesses of your current roster. The match uses the longer Boss format, leaving room for momentum swings, defensive mistakes, and overtime.
The safest offensive approach is to create repeated high-quality chances rather than expecting an enormous OVR value to win the match on its own.
The Golfers’ goalie can stop shots that appear dangerous enough to score. A rebound gives the attacking team another chance before the defense can fully reset.
Try to keep a teammate positioned to collect loose pucks near the goal while another player creates the original shot. A quick follow-up can be more effective than immediately retreating for another rush.
In a successful final match, the winning team continued producing close-range opportunities and rebounds rather than relying exclusively on distant shots.
It is also important not to mistake shot volume for good offensive pressure. Repeatedly firing from poor angles can allow the goalie to make routine saves while exposing your team to turnovers.
One final-Golfers attempt reached the deciding match with a heavily upgraded lineup and a standout attacking skater, Stu Stumple.
The team had invested heavily in its core players, including improvements to Checking and Critical Shot opportunities. Yet the Golfers produced more passes, more time on attack, and more shots.
The deciding match went to overtime and ended in defeat.
The failure was not simply a lack of attributes. The designated scorer repeatedly failed to receive the puck in the expected position, and the accumulated offensive bonuses did not translate into enough good scoring opportunities.
That gives you a useful way to diagnose your own run:
A very fast player can still be difficult to use if they outrun the passing play. A powerful shooter contributes little when every windup is interrupted or the player spends most of the attack out of position.
The Golfers can be defeated with different rosters, but the roster still needs a functional way to move the puck into scoring positions.
A late Relic or Power-up can look irresistible when it adds a large attribute bonus. Examine the full effect before selecting it.
One available late-game modifier offered +30 OVR while the game was tied, but −10 OVR otherwise.
That is a very different reward from a permanent +30. It may help during a tied match, while becoming a disadvantage after your team takes the lead.
Likewise, an effect that causes injuries can be beneficial for a skater whose build rewards being hurt, but disastrous when the same injury removes an essential scorer from action.
Before the Golfers, prioritize consistent contributions over dramatic effects that only work under rare conditions. A reliable supporting player may be more valuable than another boost to someone who already receives almost every upgrade.
Defeat the Golfers to finish the third Act and complete the campaign.
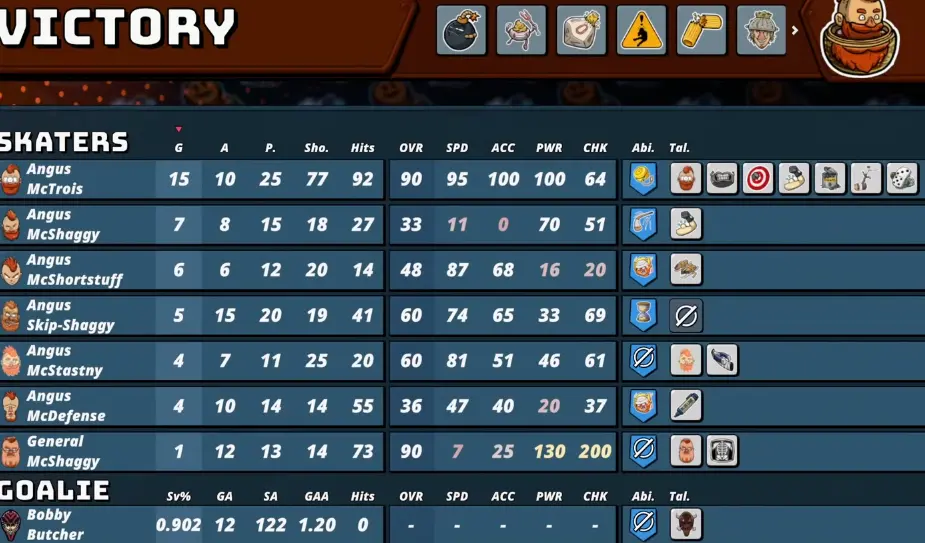
The conclusion includes the Cup and post-run statistics, showing how much each skater contributed. These results can reveal which players actually carried the team and which appeared powerful in the lineup but delivered little during matches.
In one successful run, Angus McTrois scored 15 goals and added 10 assists, finishing with 25 points. Angus McShaggy, recruited partway through the campaign, contributed another 7 goals and 8 assists. Both players made substantial contributions to the final victory.
The mid-run acquisition was therefore a significant part of the final result rather than merely a reserve added for flexibility.
After the ending, return to campaign selection and Unlockables to inspect any newly available content.
A completed campaign is a major milestone, but it does not automatically mean every Squad or achievement has been completed.
Losing an important campaign match can end your current run, including the players and upgrades assembled during that attempt. Reaching the Golfers does not protect you from having to start again after a defeat.
However, eligible challenge progress can still count even when you fail to win the Cup. After a loss, check the Unlockables menu before starting another run. Some objectives accumulate across attempts, while others require a specific result within one game or a completed winning run.
A failed campaign does not satisfy an objective that explicitly requires victory. For challenges worth pursuing during an unsuccessful attempt, check the 108 achievements and completion requirements.
The 1.0 campaign replaced the earlier puck-currency progression system with challenge-based unlocks.
You now expand your available Squads, Free Agents, Relics, Power-ups, and other content through the appropriate objectives rather than assuming the old currency and upgrade shop still exist.
When a new item remains locked after a run, check its requirement in Unlockables. Winning the campaign once is not a substitute for completing a specific challenge that unlocks that item.
For players returning from Early Access, this is one of the most important changes to understand before planning repeated runs.
Repeated failure at the same Act usually indicates that an earlier decision is leaving your team poorly prepared for that kind of encounter.
The match where you finally lose may not be where the underlying problem began.
Check whether your opening rewards created a balanced lineup.
A short First Goal Wins Challenge can be completed with one strong scorer. A three-period Boss match needs sustained offense, defense, and a way to recover possession after the opposing team creates pressure.
If most of your upgrades went to a single attacker, consider strengthening the teammates who supply passes or protect against counterattacks before attempting another Boss.
Open Edit Lineup and inspect the actual player positions.
A powerful shooter may be assigned a role where they rarely receive useful scoring chances. Another skater may have sufficient Speed but poor Shot Power or Accuracy.
Move the appropriate players into positions where their attributes matter. During the next match, watch whether the new arrangement creates better passes, cleaner shots, and useful rebounds.
Increasing OVR without changing how your team attacks can leave the same problem unresolved.
Recruitment only creates value when the player contributes a useful role or combination.
If the new skater has a strong individual attribute but duplicates an already effective starter, moving them onto the ice may weaken another part of your formation.
Compare the recruit’s ability, Speed, Shot Power, and Checking with the player being replaced. Use the Bench to develop a reserve when there is no immediate need to start them.
Injuries can change which players remain effective during the run.
Inspect active injuries after difficult encounters and before selecting another match. When an essential offensive player is impaired, a recovery opportunity can be more valuable than another minor attribute reward.
There are exceptions when your current combination explicitly benefits from injuries, but those situations require the relevant effect to be active. An ordinary injured skater does not automatically become stronger.
Check the match clock and objective.
A shot released too late can reach the net after the buzzer without being counted. In one King’s Land match, a shot entered the goal after time expired, but it did not register as a valid goal.
The same match can also have an additional Challenge condition. Winning through the regular rules is not always enough to claim a reward that specifies a larger scoring margin.
Read both the scoreboard and the objective before concluding that a successful shot should have completed the encounter.