How to Beat Ship Capture CHIMPS in BTD6 Without Micro
Beat Ship Capture CHIMPS from Round 6 to 100 with Obyn, Spirit of the Forest, Perma-Spike, and MOAB Press. Follow the tower placements, upgrade order, and difficult rounds.
Updated:
Quick Answer
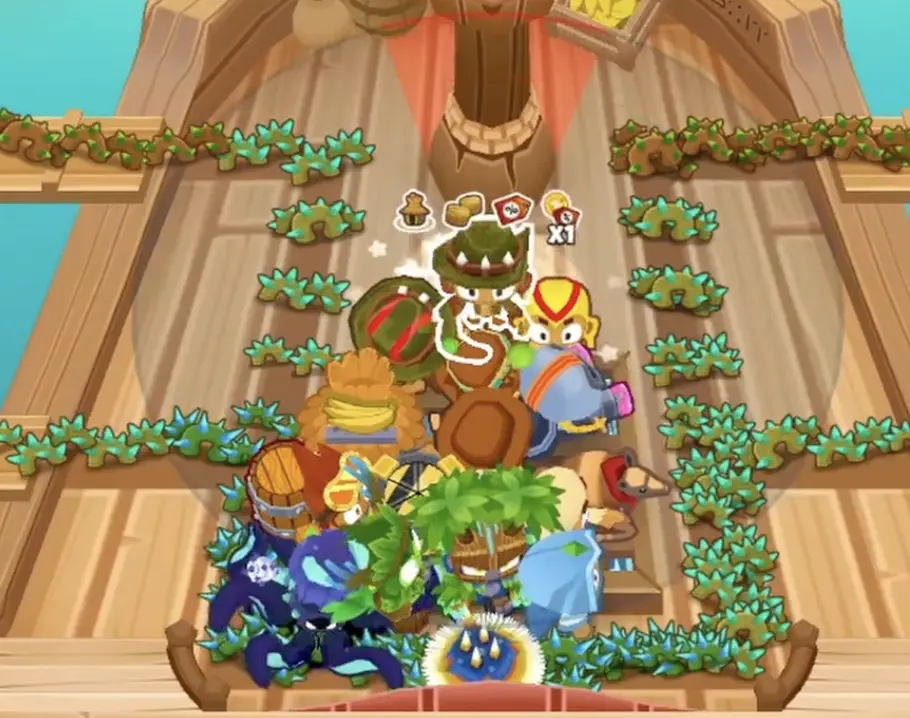
Start Ship Capture CHIMPS with two Desperados on the central grate. Add two Skywardens, place Obyn on Round 12, and build a Spike Factory by Round 18. Buy Smart Spikes on Round 20 and set its target between the two exit lanes before continuing.
Ship Capture has two dangerous approaches to the bottom of the ship. A defense concentrated on one lane can let Bloons escape through the other, while the small wooden grate in the center leaves little room for correcting poorly placed towers.
The most important early purchase is the Spike Factory. Its spikes need to accumulate near the exits where both routes can use them. The rest of the defense is built around that placement: Obyn and a small group of towers carry the opening, Spirit of the Forest takes over much of the track damage, and Perma-Spike protects the final approach.
In Update 57.0, this configuration cleared Ship Capture CHIMPS without activating abilities or using Powers or Insta-Monkeys. Update 57.1 changed some Skywarden interactions, so check the Village’s actual range before committing to the later Druid placements.
Rounds 6–20: Get the Opening Placements Right
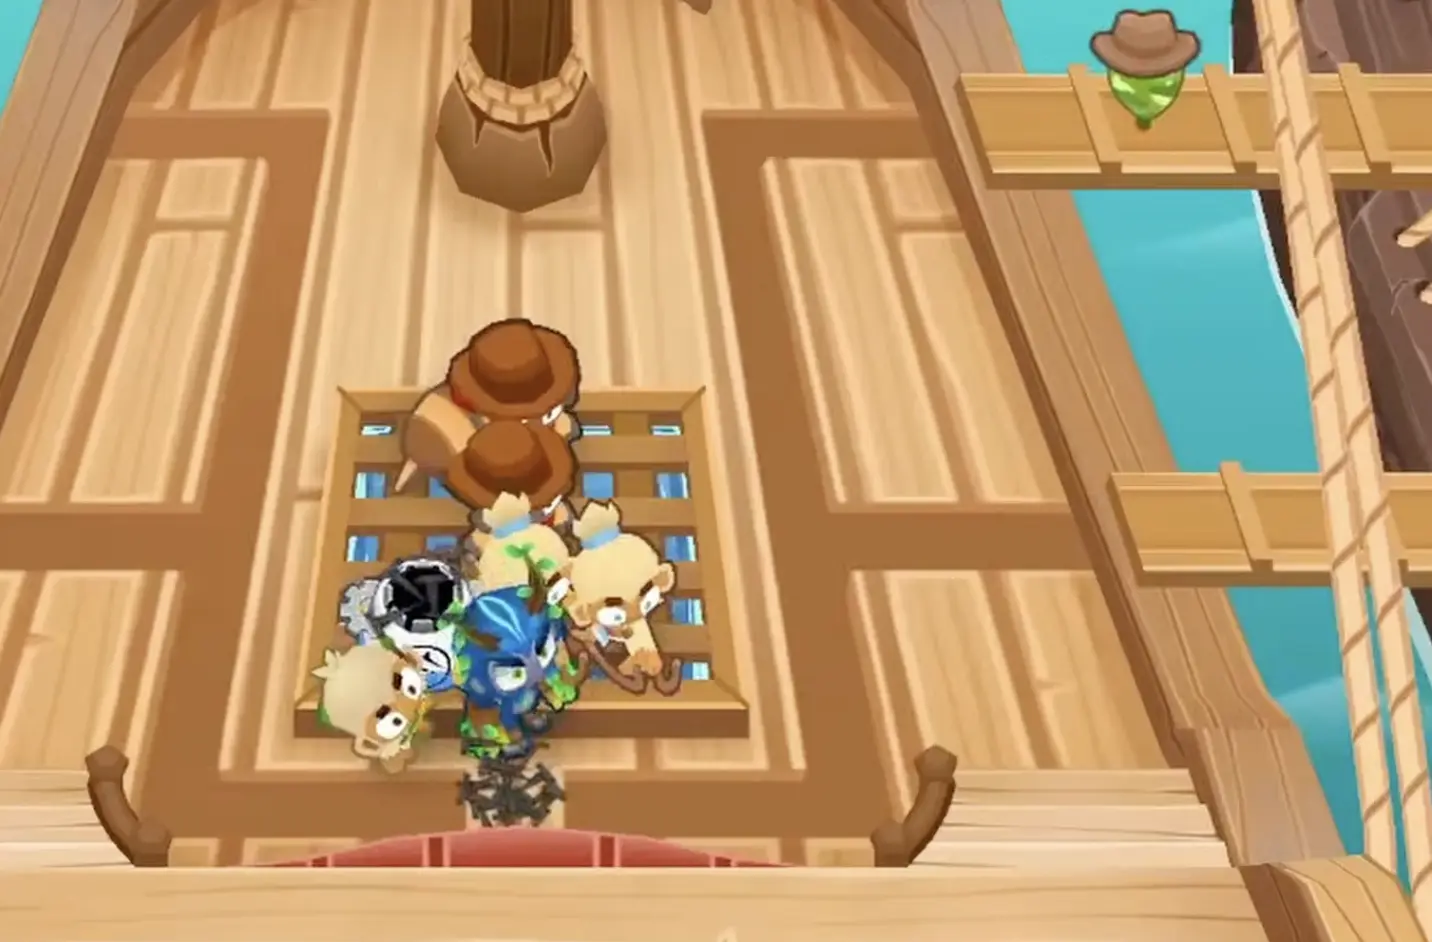
Start with two Desperados on the wooden grate in the center of the ship. The first belongs toward the upper part of the grate, with the second immediately below it.
Keep their positions tight. The space surrounding them will eventually hold two Skywardens, Obyn, a Druid, a Spike Factory, and a Mermonkey. An unnecessary gap between the starting towers can prevent one of those later placements.
Follow this opening order:
- Round 6: Place the first Desperado on the upper section of the grate and the second just below it.
- Round 8: Put a Skywarden below the lower Desperado.
- Round 9: Add the second Skywarden immediately to the right of the first.
- Round 12: Purchase Obyn Greenfoot and place him beneath the Skywardens.
- Round 14: Place a Druid to Obyn’s left.
- Round 18: Add a Spike Factory above the Druid, beside the lower-left section of the grate.
- Round 20: Upgrade the Spike Factory to Smart Spikes and set its target.
Where to Set the Spike Factory Target
After purchasing Smart Spikes (0-0-2), select the Spike Factory and use Set Target.
Position the target near the bottom of the central grate, between the final sections of the two routes. The goal is to concentrate the spikes where Bloons approaching either exit can reach them.
The default Normal targeting is less suitable for this arrangement because it does not preserve the same fixed concentration of spikes.
Watch where the first piles appear. They should accumulate near the lower central exit area, not exclusively along one outside lane.
This setting determines how much protection will be available against the first MOAB and, eventually, the late-round DDTs.
Rounds 21–40: Prepare the Spike Pile for the First MOAB
Round 40 is the first major purchase deadline. The MOAB should reach an established pile of Deadly Spikes rather than an unfinished Spike Factory that has only just received its damage upgrades.
Between R21 and R39, improve the existing defense in this order:
- R25 — Bigger Stacks: Upgrade the Spike Factory to 1-0-2. The larger piles strengthen its exit defense.
- R26 — Mermonkey and Hard Thorns: Fit a Mermonkey beside the Druid, then buy Hard Thorns on the Druid.
- R32 — Monkey Village: Place the Village directly above the Spike Factory. Develop its discount upgrades for the nearby purchases.
- R35 — Druid of the Jungle: Upgrade the existing middle-path Druid.
- R36 — Long Life Spikes: Advance the Spike Factory to 1-0-3 so its accumulated spikes remain available longer.
- R39 — Deadly Spikes: Complete the 1-0-4 upgrade before the first MOAB arrives.
Keep the same tower and the same target location throughout these upgrades. You are investing in the pile that has already been accumulating near the bottom of the ship.
The Mermonkey is another placement that should not be delayed unnecessarily. By Round 26, the central defense is compact but still has enough space for it if the opening monkeys were placed correctly.
If the Mermonkey does not fit beside the Druid, the problem is usually tower spacing, not the upgrade sequence.
Round 40: Let Deadly Spikes Handle the MOAB
The planned defense handles the Round 40 MOAB without an activated ability.
By the end of R39, the Spike Factory should have Deadly Spikes and an accumulated reserve near the exit. Other towers damage the approaching MOAB, while the spike pile provides the final protection against the blimp and its remaining Bloons.
Two conditions determine whether this works:
- Deadly Spikes must be purchased before the MOAB arrives.
- The spike pile must cover the route the MOAB and its children use near the exit.
A MOAB that breaks shortly before the exit can still release enough Bloons to end the run. The stored spikes are there to prevent that final leak.
After clearing R40, purchase Jungle Drums on the Village. The next stage develops the stronger midgame towers while keeping the original spike defense intact.
Rounds 41–54: Build the Defense That Carries the Save-Up
Your immediate goal after R40 is to develop enough damage and control to save for Spirit of the Forest. Several smaller upgrades fill specific gaps, but purchasing unrelated towers during this stage can delay the expensive Tier 5 Druid later.
R43–47: Storm Druid and Jungle’s Bounty
Add another Druid and reach Heart of Thunder by R43.
On R44, upgrade it to Druid of the Storm, with Druidic Reach for additional range. The Storm Druid helps manage Bloons approaching the central defense, while the Spike Factory remains responsible for the final exit.
The original middle-path Druid should reach Jungle’s Bounty (1-4-0) by R47.
That middle-path Druid is the one you will eventually upgrade to Spirit of the Forest. Keep it close to the Village’s useful coverage and avoid placing another tower where it blocks the Druid’s support.
Jungle’s Bounty does not provide the usual bonus income or lives in CHIMPS, so there is no need to activate its ability.
If the additional Druid cannot reach the Village’s discount area because the placement is slightly too far away, check whether Aerial Attunement on a nearby Skywarden can extend the Village’s effective range. Its range bonus depends on the applicable tower tiers, so inspect the actual coverage before making further purchases.
R50: Twin Sixes on Strong
Upgrade the upper Desperado to 4-2-0 Twin Sixes with Bullseye by R50, then change its targeting to Strong.
This tower provides focused damage against tougher Bloons while the Druids and other defenses handle the smaller targets.
The targeting choice matters more as MOAB-class enemies become common. Strong keeps the upgraded Desperado working on durable enemies rather than continually switching to Bloons already being handled elsewhere.
R54: Abyssal Warrior
By R54, upgrade the Mermonkey to Abyssal Warrior, using its Echosense crosspath.
The intended Mermonkey is the one placed beside the Druid earlier. Its central position allows it to contribute alongside the nearby towers instead of operating on an isolated section of the ship.
Rounds 55–76: Buy Spirit of the Forest
The next major purchase is 1-5-0 Spirit of the Forest, upgrading the Jungle’s Bounty Druid already in the central defense.
The target purchase window is R75–76. With enough cash available, Spirit of the Forest can be purchased at the beginning of R75. Otherwise, continue into the following round while the existing defense holds.
The upgrade dramatically changes how the map is defended. Spirit of the Forest spreads damaging vines across the track, attacking Bloons along both approaches instead of relying only on towers that can fire into their immediate surroundings.
That broad coverage is especially valuable on Ship Capture because the final defense must account for Bloons traveling toward both exits.
While saving, preserve the intended purchase order. Additional towers can improve a difficult round, but expensive optional upgrades also postpone Spirit of the Forest.
Keep saving while the existing defense clears each round. If Bloons begin escaping, identify the enemy type and strengthen only the part of the defense that cannot handle it. Spending on unrelated upgrades may delay Spirit of the Forest beyond Round 76.
A Druid that is still sitting at Jungle’s Bounty well after the intended purchase window leaves the defense without the wide track coverage it needs for the late game.
Rounds 77–84: Upgrade the Original Spike Factory to Perma-Spike
With Spirit of the Forest active, turn your attention back to the Spike Factory from the opening rounds.
It should already have Deadly Spikes (1-0-4) and the exit-side targeting established near R20. Continue from that same tower instead of placing a new factory elsewhere.
The next purchases are:
- White Hot Spikes: Complete the top crosspath to 2-0-4.
- Perma-Spike: Finish the bottom path to 2-0-5 by R84.
White Hot Spikes provides the necessary Lead-popping capability for the spike defense, which becomes especially important against DDTs.
Perma-Spike then creates a much more durable reserve at the bottom of the ship. Spirit of the Forest removes many ordinary threats before they reach the exit, allowing the factory to retain more protection against the dangerous survivors.
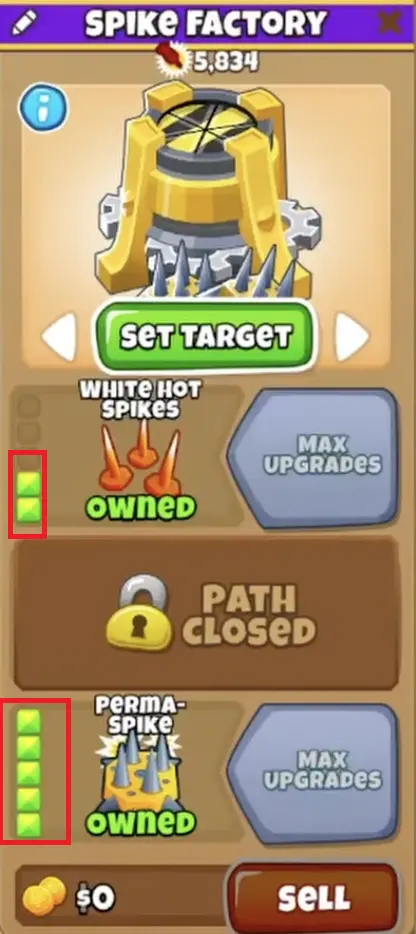
Reaching this upgrade before the DDT-heavy rounds is more important than buying another general-purpose damage tower.
The combination of Spirit of the Forest and Perma-Spike forms the foundation of the finished defense. The remaining purchases improve how long dangerous MOAB-class Bloons remain within its reach.
Rounds 85–94: Finish the MOAB Control Setup
The late-game purchases are focused on slowing larger targets and strengthening Perma-Spike. You do not need another expensive Tier 5 to complete this setup.
R85–86: Relentless Glue
Add a Glue Gunner and purchase Relentless Glue (0-0-4) on R85. Set its targeting to Strong.
Build its middle crosspath with Bigger Globs, then reach Glue Splatter by R86 for the completed 0-2-4 configuration.
The Glue Gunner should cover MOAB-class enemies before they reach the final spike reserve.
Strong targeting helps it focus on the larger threats that need to be delayed. Its contribution is control: keeping dangerous enemies on the track long enough for the rest of the defense to finish them.
R88: First MOAB Press
Buy a Boomerang Monkey and upgrade it to MOAB Press (x-x-4) by R88. Change its targeting to Strong.
MOAB Press knocks back MOAB-class Bloons, slowing their progress toward the exits. This becomes more valuable in rounds where several larger enemies approach together.
The main damage towers can defeat these enemies, but they need enough time to deliver that damage. MOAB Press provides that time without requiring an active ability.
R92: Berserker Brew for Perma-Spike
Place an Alchemist where it can reach the Spike Factory and purchase 3-0-1 Berserker Brew with Faster Throwing.
Its placement is important because the intended recipient is Perma-Spike. The Alchemist should be close enough to buff the factory rather than positioned on an unrelated section of the ship.
Do not spend the remaining money on an unnecessary Alchemist Tier 4 before completing the planned MOAB Press support.
R94: Three MOAB Presses on Strong
By Round 94, add two more MOAB Presses (x-x-4), bringing the total to three, all targeting Strong. Position them to knock back MOAB-class Bloons before those enemies reach the exit-side Perma-Spike reserve.
Check Your Final Tower Placement Before Round 95
Before starting Round 95, confirm that all 15 towers are in place:
- 2 Desperados and 2 Skywardens: The opening formation around the central grate.
- Obyn and 2 Druids: The central group, including Spirit of the Forest.
- 1 Spike Factory: Upgraded to 2-0-5 Perma-Spike, with its target near the exits.
- 1 Mermonkey: Beside the original Druid, upgraded to Abyssal Warrior.
- 1 Monkey Village: Above the Spike Factory, covering the nearby towers.
- 1 Glue Gunner: Upgraded to Relentless Glue and targeting Strong.
- 3 Boomerang Monkeys: All upgraded to MOAB Press and targeting Strong.
- 1 Alchemist: Close enough to apply Berserker Brew to Perma-Spike.
Confirm that the Alchemist can reach the Spike Factory and that the MOAB Presses cover approaching MOAB-class Bloons before they reach the exit-side spike reserve.
There is no need to purchase MOAB Domination or add another Tier 5. Keep any remaining money available rather than changing the working arrangement at the last moment.
Rounds 95–100: Finish Without Activated Abilities
By the start of R95, the important upgrades should already be purchased.
The remaining rounds depend on the interaction between the existing towers rather than on activating skills at specific moments.
Round 95 — DDT pressure
DDTs combine Camo and Lead properties, so ordinary MOAB Presses and Relentless Glue cannot target them without additional Camo detection.
The main protection here comes from Spirit of the Forest’s track-wide vines and the 2-0-5 Perma-Spike reserve near the exits. Both upgrades should be complete before this round begins.
Round 98 — Dense MOAB-class groups
This is a major test of how well the support towers delay large groups. Multiple MOAB Presses keep dangerous enemies from progressing too quickly, giving Spirit of the Forest and the other towers more time to attack.
The goal is to reduce how many enemies consume the spike reserve before R100.
Round 99 — Fortified DDTs
The Fortified DDTs are tougher than the DDTs on Round 95. The priority is having enough Perma-Spike remaining at the exits to catch them before Round 100 begins.
Round 100 — BAD
Let the completed setup fight the BAD with its normal attacks.
Spirit of the Forest, the other damage towers, and the remaining spike reserve finish the final encounter. There is no required Obyn, Druid, or other active ability timing.
Round 100 Victory Results
The final setup cleared Ship Capture CHIMPS with 15 towers, using zero abilities, Powers, or Insta-Monkeys. Total cash spent was $138,305.

Why Is Ship Capture CHIMPS Still Failing?
A required tower will not fit: The opening formation occupies too much of the central grate. Compare the Desperado and Skywarden positions with the Round 20 layout. Because CHIMPS disables selling, an incorrect early placement may require restarting.
Round 40 breaks the MOAB, but its children leak: Look at the spike pile, not just the MOAB damage. Deadly Spikes must be ready before the round, with the target positioned near the shared exit area.
Spirit of the Forest is unaffordable around R75–76: Review spending after the Round 54 purchases. Additional support upgrades and missing Village discounts can delay the Tier 5 Druid.
DDTs escape on R95 or R99: MOAB Press and Relentless Glue cannot directly target Camo DDTs without detection support. Check whether Spirit of the Forest is active and whether the 2-0-5 Perma-Spike has accumulated enough spikes at the exits.